


I've been a little absent from my blog for a few weeks, the main reason is that it was Simon's 40th birthday last week and I've been busy behind the scenes getting the house ready for a party and making the odd birthday cake or 2...
One of the very first images that I pinned to Pinterest was this picture from the Martha Stewart website, and I've been desperate to give it a try for well over a year.
At the same time I also found this fabulous 40 on Pinterest to celebrate a ruby wedding anniversary.
I love both of these, but I wanted something a little less formal. This was simply to surprise my husband and for a fun display at a casual party. Although I do think that it looks much more professional and unified in black and white, I believe that the colour images tell a story so much better.
 |
| © Martha Stewart |
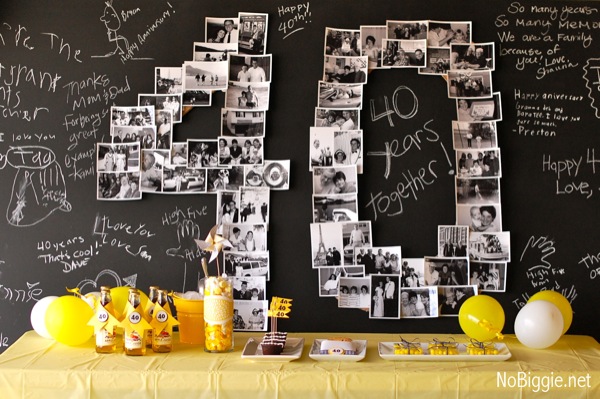 |
| © NoBiggie |
I love both of these, but I wanted something a little less formal. This was simply to surprise my husband and for a fun display at a casual party. Although I do think that it looks much more professional and unified in black and white, I believe that the colour images tell a story so much better.
I spent a very nice couple of days searching through old photos trying to get images from every age. I actually ordered over 70 photographs, all in 6 x 4 and all with the white border in place. In retrospect I should have edited my photos a bit more so that I got a varied selection of sizes, as a few smaller images would have made my life a lot easier and given my number more depth and definition, but that would have taken a lot more pre-planning. I'll know for 50!
I measured the space that I wanted my number to fill. It really is a case of the bigger the better. Mine is 90cm tall, but that's only because that was the size of my space. If I could have gone bigger I would have.
I typed in my number in Photoshop using Garamond in 1000 point, cropped the number and then increased the size to 90cm tall.

It was then just a case of cutting out A4 sized sections of the number so that I could print them all out like pieces of a jig-saw.

As I pasted each new page I typed a number onto the cut edge to help me to piece them all together later on.

Then all I had to do was print them onto cardstock, cut them out and tape them all together. I stapled some ribbon to the top so that I could hang them with weights from the sill in the conservatory.

(This, by the way, is smaller than my final number... more on that later.)
I went through my pictures and chose the best ones, I'd ordered many more than I needed and I found that the most suitable pictures were the ones that were more closely cropped. To attach them I just used some white tack, which allowed me to reposition them if needed.
I should probably mention again how much size matters in this project. This was my second attempt. The first one I did was 70cm tall, but the definition of the numbers was very poor as you can see...

If only I'd ordered some smaller photographs it would have worked fine.
As the numbers were hanging freely from a single ribbon, the numbers needed reinforcing with garden canes to stop them from bending and warping under the weight of the photographs. If, unlike me, you were willing to stick them to a wall, then this wouldn't be an issue.

I then made my weights look a bit more presentable with a little blue fabric and ribbon. For weights I used 2 bags of plastic doll weights. I added a piece of non slip matting to prevent the ribbon from slipping down under the weight of the photographs.

And there you have one very nice talking point for your birthday party. Thank you Martha Stewart!
I really enjoyed this project, mostly because it gave me many nostalgic hours choosing the photographs, but also I managed to tick off another Pinterest find I've been longing to try out.
Please be sweet and share the love. Leave a comment, subscribe to my YouTube channel, like my Facebook page for regular updates or follow me on Pinterest, Bloglovin' or Instagram
1 comment:
Such a great idea for a party! Love it! Would love it if you would link this up to Give Me The Goods Monday: 1 Party, 4 Blogs! http://www.rainonatinroof.com/2013/05/give-me-goods-monday-link-party-8.html
Jenna @ Rain on a Tin Roof
Post a Comment