


This blog post was first published on the 27th of November, 2018. As it is currently one of my most viewed posts, I will try to update it as the Electric Eel Wheel continues to evolve. Last updated: 30th of June 2026.
If you are simply looking for a visual reference to work out which Electric Eel Wheel model you have purchased, I've made this short video showing the Electric Eel Wheel progression -
Eleven years ago, I wrote a review of the Electric Eel Wheel 4. I loved that little wheel, but it did have quite a few issues - some I managed to overcome, but others I just endured.

Despite its problems, I was so thankful for the invention of the Electric Eel Wheel 4, as it allowed me to try spinning on an electric spinning wheel for the first time, at a price that was low enough for me to take the risk.
I thought it would be interesting to look back at the inception of the Electric Eel Wheel to see just how far it’s come from its humble beginnings, and to show a little of what the future holds for this little machine that’s taking on the big boys.
The Electric Eel Wheel
Maurice Ribble, the inventor of the Electric Eel Wheel, has been committed to designing and inventing an affordable, yet extremely usable electric spinning wheel for several years now. He felt that spinners were being exploited, and that it was time to introduce a little competition to redress the balance.
I first heard about the Electric Eel Wheel when I was searching online for an affordable e-spinner - I desperately wanted an electric spinning wheel as I had to stop using my beloved Ashford Traveller, as treadling was damaging my hip joint.
Unfortunately, when I first looked, every electric spinning wheel was prohibitively expensive, especially as there was no way for me to find out if I would even enjoy using an e-spinner before I bought it.
I did, however, stumble upon Maurice Ribble's blog, where he talked about his experience designing an electric spinning wheel at a more affordable price.
I love looking at these early images of the Electric Eel Wheel in its infancy. It shows just how far the Electric Eel Wheel has come in a little over a decade. The romantic in me also loves the fact that it was invented for his wife, Emily, to save her from lugging a full-sized spinning wheel around to spinning and knitting groups.
I love how home-made and functional it looks in its wooden box! Still, Maurice realised that there was a demand for this slightly inelegant-looking e-spinner when many of Emily's friends started asking him to make one for them. At the same time, Maurice also generously ‘gave away’ his design as an open-source project, helping other spinning enthusiasts to build their own Electric Eel Wheels at an affordable price.
It was now starting to look ever so slightly more commercial, with a custom, plastic controller box to protect the electronics. It was, however, still modestly hiding away in its box.
Unfortunately, when I first looked, every electric spinning wheel was prohibitively expensive, especially as there was no way for me to find out if I would even enjoy using an e-spinner before I bought it.
 |
| Image from Glacial Wanderer, January 2009 |
I did, however, stumble upon Maurice Ribble's blog, where he talked about his experience designing an electric spinning wheel at a more affordable price.
I love looking at these early images of the Electric Eel Wheel in its infancy. It shows just how far the Electric Eel Wheel has come in a little over a decade. The romantic in me also loves the fact that it was invented for his wife, Emily, to save her from lugging a full-sized spinning wheel around to spinning and knitting groups.

I love how home-made and functional it looks in its wooden box! Still, Maurice realised that there was a demand for this slightly inelegant-looking e-spinner when many of Emily's friends started asking him to make one for them. At the same time, Maurice also generously ‘gave away’ his design as an open-source project, helping other spinning enthusiasts to build their own Electric Eel Wheels at an affordable price.
By the next year, you could buy a kit to build your own spinning wheel in a box, and if you didn't have the technical know-how, you could buy an assembled version.
 |
| Image from Glacial Wanderer, February 2010 |
You can see that the Electric Eel Wheel is gradually rising out of the box, and it's started to become a little more compact.
The Electric Eel Wheel 2
Later that year, Maurice made several improvements on his original design, improving the motor life and reducing the volume, increasing the bobbin capacity, and improving the assembly process, making it easier for people who bought it in kit form to make their own. This was the birth of the Electric Eel Wheel 2.
 |
| Image from Glacial Wanderer, September 2010 |
It was now starting to look ever so slightly more commercial, with a custom, plastic controller box to protect the electronics. It was, however, still modestly hiding away in its box.
The Electric Eel Wheel 3
By 2013, there was enough demand for the Electric Eel Wheel (in what was still a very niche market) that Maurice was able to redesign it, using laser-cut parts bought in bulk, making it cheaper to build and quicker to assemble.
 |
| Image from Ponoko.com, September 2013 |
The Electric Eel Wheel 3 was a much more professional and commercial-looking machine, and it had finally escaped out of the box! It was starting to look a little more like the later commercially available Electric Eel Wheels. Anecdotally, I know a lady who still owns this version of the Electric Eel Wheel, and it spins just as well as any spinning wheel. She does find it quite noisy, though.
The volume of the Eel is one of the main problems that Maurice Ribble has had to try to overcome and is continually trying to improve. Keeping the cost down meant using a cheaper motor and light, thin veneered wood, which just aren't going to be as quiet and as stable as a heavy, solid hardwood electric spinning wheel, using a brushless motor.
In 2013, an Electric Eel Wheel 3 sold for $290, and you could buy a self-assembly kit for $240. That's pretty incredible considering that it was difficult to buy any kind of decent e-spinner for less than $800 at the time.
The Electric Eel Wheel 4
In March 2015, Maurice took the big step of launching the Electric Eel Wheel on Kickstarter, in the hope of funding the production of the 4th iteration of his little wheel. For the project to go ahead, he needed to raise $5,000. In the end, with the help of 245 backers, he managed to raise over 10 times that.
Some of those original 245 backers (myself included) helped to form a community on Ravelry where they showed off their altered wheels, shared spinning tips, showed off the yarns they had spun, and gave new spinners advice. Fundamentally, they also shared issues that they had with their wheels - the main problems being the sound levels and the sharp yarn hooks. The wonderful thing is that Maurice was, and is, a very active member of that group, and Maurice listened to everybody. Maurice also read my blog post about the Electric Eel Wheel 4, too, and took on board all of my comments.
Continuing in this spirit of openness and sharing, the Electric Eel Wheel 4 is open-sourced, and if you are technically minded enough to build your own, you can find more information on how to here.
The Electric Eel Wheel 5
November 2016 saw the Kickstarter for the Electric Eel Wheel 5. Maurice Ribble wanted to address everyone's issues to make an even smaller, quieter spinning wheel with a more usable sliding hook system. A lot of the people who invested in the first Kickstarter jumped on board to get the improved Eel Wheel, and word was slowly spreading about this new, affordable electric spinning wheel. With a target of $5,000 to get the project off the ground, the Electric Eel Wheel 5 raised over $90,000 on Kickstarter, which is pretty incredible when you consider that this is a niche product that very few people have seen in person.

There is no doubt that the Electric Eel Wheel 5 and its later updates were a significant improvement on the Electric Eel Wheel 4 and its predecessors. The sliding hook system on the 5 caused a lot less frustration (once the initial issues had been resolved), and the sound levels were much improved.
Here is a little video showing the 4 and 5 side by side, just to get an idea of the difference in volume.
You can hear that the 5 had thankfully lost that annoying high-pitched whine that irritated most people. The Electric Eel Wheel 4 noise levels measured about 68 decibels, but the Electric Eel Wheel 5 measured a much more bearable 59 decibels. (For reference, 70 decibels is twice as loud as 60 decibels.)
My family are all quite sensitive to noise, and so I purposely wouldn't use the Electric Eel Wheel 4 when others were in the room, as I knew the noise would be too loud for anyone to watch the television at a comfortable level. I was, however, happy to use the Electric Eel Wheel 5 with others in the room - albeit at a slightly lower speed than when I was on my own.
I should probably point out that the first Electric Eel Wheel 5 came with a plastic flyer spindle and sliding hooks. Quite a few spinners (myself included) started to see erosion of the plastic where the spun yarn was running over the plastic, and so Maurice sent out replacement aluminium flyer spindles and sliding hooks to anyone affected.
The Electric Eel Wheel 5.1
Maurice is constantly working on new ideas and asking members of the Ravelry forum what they want in an electric spinning wheel, whilst listening to the problems and issues that arise. It's a very unique and open business model, and it's almost like later models of the Electric Eel Wheel have been designed by Maurice, but with Ravelry members as his design consultants. Most companies are incredibly secretive about new ideas and inventions, but Maurice will happily risk sharing designs and ideas that he has for future models of the Electric Eel Wheel, knowing that feedback from Ravelry members has helped the Electric Eel Wheel become the little gem it is today.
I never actually got around to writing a review for the Electric Eel Wheel 5, as Maurice brought out the 5.1 very soon after everyone received their updated aluminium flyer rods and hooks.

The 5.1 had a coat of varnish on it, so it looked much more finished than his previous wheels. I did have a problem with wood chipping off both of my wheels, so this definitely takes the design up a notch. It also felt more finished and professional as the underneath was enclosed by a detachable base. Probably the biggest improvement made for the 5.1 was that the bobbins had bearings at either end - making them quieter than the Bobbins Up bobbins that shipped with the 5.0
The Electric Eel Wheel Mini
 |
| Image from Kickstarter, November 2017 |
In November 2017, Maurice Ribble launched a Kickstarter for a new kind of Electric Eel Wheel - The Electric Eel Wheel Mini. It was one of his most ambitious spinning projects yet, as he challenged himself to make the smallest, most affordable electric spinning wheel ever. Some would say that he'd already done this with the Electric Eel Wheels 3 - 5, but Maurice wanted to make a wheel that was even more affordable, to encourage many more people to try spinning for the first time. The Electric Eel Wheel Mini was sold on Kickstarter for an amazing $50. Unsurprisingly, over 1000 people backed it.
Maurice described it as a new category of spinning wheel to help bridge the gap between drop spindle and spinning wheel, the price being far closer to that of a drop spindle.
Inevitably, with such a low price tag came compromises - it was quite noisy, and it was so light it needed to be strapped down to stop it from vibrating too much. Changing direction to ply was also slightly awkward, but it was still an excellent introduction to spinning for a lot of people, many of whom went on to upgrade to the larger model once they were confident that they enjoyed spinning.
The Electric Eel Wheel 5.2
 |
| Image from Dreaming Robots |
In November 2017, the Electric Eel Wheel 5.2 was released. This went up for sale on the Dreaming Robots site. Once word went out that they were for sale, 100 wheels sold out in less than a day.
I love the fact that it retailed at $260, which is $30 less than the Electric Eel Wheel 3 sold for, way back in 2013. It just shows that being able to buy materials in bulk and mass-produce many elements of the wheel has enabled Maurice to pass these savings on to his customers.
One of the most notable differences was the plastic flyer wheel. At the time, I was very torn on the decision to use plastic for the flyer. I much preferred the look of the wood, but I appreciated that plastic helps to keep the price down when you are working in large quantities - also, the thin wood of previous flyers could warp, which would add to the noise levels and the vibration of the wheel itself.
The frame had bearings built into the front and back for the flyer spindle to sit in to help quieten the wheel further. The back panel hinged downwards to make it easier to change the bobbins. I loved these design features, and you can see that Maurice was increasing his focus on improving the quality feel of the wheel significantly, while still keeping it at a price that was affordable for a large number of spinners.
 |
| Image from Dreaming Robots site |
The spindle was also made from one piece of solid steel - the earlier flyer spindles were made from two pieces of aluminium screwed together, and some people found (myself included) that the rods weren't completely straight, which added to the wobble of the wheel. (Mine would go for a little walk when I used the aluminium spindle at high speeds.) Making it from one piece of steel lengthened the life of the spindle and reduced the chance of having a 'wobbly wheel'.
Quite a few people on the Ravelry forum requested a faster wheel so that they could ply faster and spin shorter fibres more easily. The 5.2 spun at a maximum of 1400 rpms, which is 40% faster than the previous model.
The sliding hooks also changed, making them significantly easier to move than the ones on the 5.1. I must say, though, I was a little uneasy about how they looked, but aesthetics are probably a little more important to me than most.
There is a regular discussion on the Electric Eel Wheel Ravelry forum on the aesthetics of the Eel and how important keeping the price down is, compared to how the wheel looks, and the functionality of the wheel. Personally, I would rather pay a little more for an attractive, quiet wheel, but opinion is very much split on this issue. Making the Electric Eel Wheel as affordable and as enjoyable to use as possible is at the forefront of Maurice's design concept, and I cannot fault him for that.
The Electric Eel Wheel Nano
(*I'm a Dreaming Robots' Affiliate - if you click through to the following product links and make a purchase, I may receive a small percentage of the purchase price at no additional cost to you. Any income from my blog goes a small way toward funding future blog posts.)
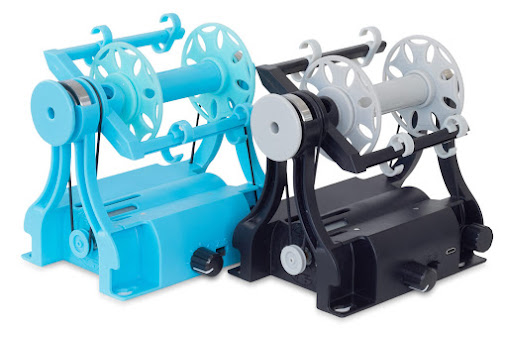
After the success of the Electric Eel Wheel Mini, Maurice took the feedback he received from his tiny wheel and made a radical decision - to design the new updated version completely out of plastic. As it was a complete redesign, and even smaller than the Mini, this tiny spinning wheel got a name all of its own - the Nano.
At first, quite a few people were quite uneasy at the thought of having a completely plastic spinning wheel, but as images and footage of the wheel began to come out, people started to come around to the concept of a tiny plastic spinning wheel. The primary reason for making the Electric Eel Wheel Nano was to make an affordable, yet easy-to-use electric spinning wheel. By using modern injection moulding techniques, it's much easier and cheaper to make a thousand wheels out of plastic than it is out of wood. Also, by making the frame out of plastic rather than several pieces of wood, there are far fewer variables, making for a quieter wheel with fewer vibrations.
 |
| Image from Kickstarter, November 2018 |
The Kickstarter for the Electric Eel Wheel Nano launched on the 15th of November 2018, and it reached its target in less than an hour. By the end of the campaign, there were 4,351 backers pledging $498,671 in total. It successfully exceeded its goal by 3,324%.
Due to many people bulk buying, the total number of Electric Eel Wheel Nanos sold was 5,381! That's some achievement and had a massive impact on the number of people learning to spin in 2019.
The Nano has a much more open design than any of the previous Electric Eel Wheels, allowing you to see how much yarn is on the bobbin very easily. It's also significantly quieter than the previous Mini and quieter than the 5.0. Changing direction is done with the flick of a switch, which is a real improvement on the previous Mini.
The basic Kickstarter package was just $60. I'm in the UK, and so with shipping and tax, this would have cost me a total of £80. Even for an entry-level spinning wheel, that is incredible!
The Electric Eel Wheel Nano 1.1
 |
| Image from the Dreaming Robots Website |
In the Spring of 2020, Maurice brought out an updated version of the Kickstarter Nano. This version had an improved motor, the yarn guides were a little more user-friendly, and the motor pulley rod was changed to prevent slipping. It retailed at just $110 and was by far the cheapest spinning wheel around. The Nano 1.1 has a bobbin capacity of around 55g and a maximum speed of 1000 rpm.
The Electric Eel Wheel 6

Following the success of the Electric Eel Wheel Nano, there was a real demand from Nano owners for a full-sized, production version, with a faster motor and a foot pedal to turn it on and off. The Nano was built with affordability at the heart of its design. With a bigger budget and fewer price constraints, Maurice was able to design the Electric Eel Wheel 6 to be faster, quieter, and with a greater capacity than any of his earlier wheels. The Electric Eel Wheel 6 has a bobbin capacity of around 225g and a maximum speed of 1800rpm.
The Kickstarter for the Electric Eel Wheel 6 launched in May 2020, with a goal of $30,000. The Kickstarter campaign eventually raised well over $445,000 and meant that over 1800 people could afford to buy themselves a production-level e-spinner. The original Kickstarter Electric Eel Wheel 6 sold for $199 and was later sold for $289 on the Dreaming Robots website.

This is the version of the Electric Eel Wheel 6 that I own, and it is still one of my most-used e-spinners.
When I received my Kickstarter Electric Eel Wheels 4 and 5, I made videos to demonstrate their volumes. I made the first video because I felt that the EEW4 was uncomfortably loud and the second because I was pleased with the improvements that Maurice had made to the volume of the wheel.
When I received my Electric Eel wheel 6 it seemed only fitting to make a video to demonstrate the further improvements Maurice has made to the Eel's volume, and to show how much quieter it is than the previous models -
Unfortunately, I've modified my Electric Eel Wheel 5 to use bearings so I can't do a true side-by-side comparison but hopefully, this video demonstrates the difference having bearings in the flyer and bobbins, using a brushless motor and making it out of injection moulded plastic instead of laser cut plywood makes.
In simple terms, the Kickstarter Electric Eel Wheels have halved in volume with each iteration.
The Electric Eel Wheel Nano 2.0
 |
| Image from the Dreaming Robots Website |
The Nano 2.0 uses 5v instead of 9v and is powered by a USB cord, making it even more portable than the previous model. (It can be powered by most pocket-sized phone charging batteries or plugged into the USB phone socket in your car or laptop.) The motor is 10% faster than the previous Nano 1.1, and the bobbins screw together securely instead of being friction-fitted. (The Nano 1.x bobbin ends could occasionally pop off when the bobbin was full...) The plastic yarn guides move more smoothly than the earlier wire yarn guides, and the flyer is moulded as one piece instead of having the arms screw in separately, making them less likely to become unbalanced.
The Electric Eel Wheel 6.1
In May 2024, Maurice brought out an improved version of the Electric Eel Wheel 6 - the EEW 6.1. It is currently listed on the Dreaming Robots website for $299.
- The circuit board was redesigned to improve reliability and reduce static issues.
After backers received their Kickstarter EEW6s, some spinners found that static build-up could cause the circuit board to reset itself, turning it off randomly. Maurice fixed this soon after the Kickstarter launch, but if you have a very early EEW6, you can find the fix for that here.
- The motor was made slightly faster, and a 'soft start' feature was added to gradually ramp up the speed. A D-shaped motor shaft and pulley connection was added to prevent slippage.
- The flyer was injection-moulded using glass-reinforced nylon, and an optional brace was added to prevent the arms from flexing at high speeds.
- Dedicated on/off and S/Z direction switches were added, with white text for better visibility. The switches are also interchangeable for left or right-handed users.
- Optional plastic yarn guide covers were introduced to clip over the metal wire hooks to prevent heavily textured yarns from getting snagged. You can read my blog post about testing the plastic covers here.
The Electric Eel Wheel Fold
In January 2025, Maurice launched the Electric Eel Wheel Fold on Kickstarter. He wanted to build an ultra-portable, folding e-spinner that was faster and more compact than the Electric Eel Wheel 6. With its narrower flyer span, the Fold's able to meet the speed requirements of both the beginner spinner and the more experienced, high-speed long-draw spinner.

1,882 spinners backed the Fold Kickstarter, pledging a total of $435,203 between them. The Kickstarter price was just $199 and will retail on the Dreaming Robots website for $279.
- The Fold bobbin size sits midway between the Nano and the EEW6 at about 100g capacity.
- Both the maidens fold underneath the e-spinner to store neatly inside the battery case, making it cheaper to ship and perfect for spinners who travel regularly or want to pack it away for storage.
- It has a maximum speed of 3000 rpm, making it the fastest of all the Electric Eel Wheels. It also has two spinning profiles, making it easier to fine-tune the lower speeds on the dial. Ideal for more sedate spinners like myself!
- There's a digital RPM display, allowing you to ensure consistency between yarns.
- Maurice used a closed-loop system for the first time with the Fold. This is a motor control algorithm that automatically maintains your selected flyer speed, regardless of how much you pull on the yarn.

- The Fold also features a built-in twist-keeper, giving the spinner a location to wrap their singles mid-spin.
The Fold is due to land in America in July 2026 and will be shipped shortly after.
The Electric Eel Wheel Nano 2.1
In September 2025, Maurice Ribble released the Nano 2.1 on the Dreaming Robots website, and this is the current model available today. When Maurice released the Electric Eel Wheel Mini and Nanos, the primary goal was to make the price as accessible as possible to appeal to new spinners who might simply be curious about taking up spinning as a new hobby. Unfortunately, the original minimalist design meant that a little tinkering was sometimes necessary, which isn't ideal when you’re new to spinning.
The Nanos 1, 1.1, and 2 would regularly be described as 'finicky' by new spinners. I personally modified all of my Nanos within days of receiving them to use a spring and cord tension system, but that's quite a big ask of someone who's never spun before.
There was also an issue with the plastic flyer eroding over time, especially when spinning strong fibres very finely.
With a growing demand for Maurice to make the Nano more durable, quieter, and more beginner-friendly, he developed the Nano 2.1

I was a beta tester for this model, and at the time, I firmly believed that the Nano 3 would have been a much more appropriate name for this iteration of the Nano, given the number of improvements he was making.
- The Nano 2.1 has a completely redesigned flyer with a tilted orifice, making it much more forgiving of beginner yarns.
- The flyer is made from glass-reinforced nylon, which firmly tackles the problem of yarn eroding the flyer orifice.
- The tension knob now stays solidly in place when you turn the tension right up.
- The yarn guides are much more rounded, reducing friction and the need for additional tension.
- The bobbins have bearings at either end to reduce bobbin chatter, are much more open in design, and now only have one brake band pulley end to avoid confusion.
- The Nano 2.1 now uses a spring and cord tension system and is much more responsive than the original elastic tension system.

As of June 2026, the Nano 2.1 retails at $139, but with affordability at the heart of the Electric Eel Wheel range, Maurice also sells an upgrade kit for Nano 2.0 owners for $39, allowing them to purchase just the improved flyer, bobbins, and tension system to fit to their existing Nano 2.0 without the expense of a completely new spinning wheel.
The Competition
You only have to look at the number of new Electric Eel Wheel forum members every day on the Ravelry forum and on the Facebook group to see how much talk there is amongst spinners about the Electric Eel Wheel and how information about it is slowly spreading by word of mouth, whether it's amongst spinning friends or over social media. Everybody loves a bargain, and everyone loves to share information about bargains with their friends. Telling everyone that you just spent $1,200 on a new spinning wheel might be considered a little vulgar, but plenty of people were telling the world about the $60 spinning wheel they'd just backed on Kickstarter.
The big e-spinner companies still aren't taking the Electric Eel Wheel seriously and continue to make big claims about their own electric spinning wheels - the Ashford site describes their e-spinner as the smallest, lightest, and most versatile electronic spinner ever, and the Hansen website describes their e-spinner as the lightest, most compact, technically advanced e-spinner that is commercially available today. (Incidentally, the Ashford e-spinner weighs 2 kilos, the Hansen weighs 2.2 kilos, and the Electric Eel Wheel 6 weighs 1.4 kilos.)
Since I wrote this blog post in 2018, there have been a few more smaller e-spinner companies entering the market, but the Electric Eel Wheel is still holding its own as by far the best value-for-money e-spinner on the market. I believe that with the current performance of the Nano 2.1 and the Electric Eel Wheel 6.1, the big companies have got some serious competition on their hands that they can't afford to ignore anymore.
---
Future Electric Eel Wheels
Maurice Ribble is fundamentally an inventor who found a gap in the market. He's constantly working on new ideas and designs. He compares the design process of the Electric Eel Wheel to mobile phone companies, constantly working on future iterations of the device - improving it and upgrading it to maintain interest in the product and to keep it fresh and innovative.

His latest project is developing a 3D printed e-spinner. The idea is that he will sell a maker kit which will include stl files and non-plastic hardware for people who already own 3D printers. He's hoping that providing makers with a basic e-spinner design will encourage spinners and makers to build, alter, and develop their ideal e-spinner, driving innovation and encouraging new ideas. It will be Maurice's most affordable e-spinner option available. I'm sure it will be exciting to see the creativity of the spinning community when they're effectively given the ability to design and build their own e-spinner!
Now that Maurice has cornered the market in affordable e-spinners, he's considering developing a much more high-tech version in the future, to accompany his entry-level-priced e-spinners. One request that is often made on the Ravelry forum is for the Electric Eel Wheel to have some kind of auto-flyer, similar to the WooLee Winder, so that spinners don't have to constantly keep stopping to move the sliding hooks. Maurice is working on his own level winding system for a Pro version of the Electric Eel Wheel, and it is very much in development. It will have a built-in graphical screen to help display a menu system and an advanced motorised tension system. Unfortunately, with all of the other fibre-related products that Maurice has planned over the next couple of years, we'll have a while to wait and see what other pro features will be on this new wheel...
If you've found this post interesting or useful, please pin this image to Pinterest. It makes a big difference to me and helps other spinners find it too.
At this point, I normally suggest similar fibre-related blog posts, however, my list of spinning content is becoming a little unmanageable... If you'd like to read more blog posts about spinning and fibre preparation, please take a look at this page here where you will find links to all of my spinning and fibre articles.
Thank you for reading, and happy spinning!
---
Related Posts
 |
| Electric Eel Wheel Nano Orifice Reducer with a built-in Twist Keeper and Other Modifications |


 |
| Using the Electric Eel Wheel Yarn counter to sample yarn gauges and ply the yarn I want |
 |
| Testing New Yarn Guide Covers for the Electric Eel Wheel 6 |
 |
| Testing the LWS Autowinder for the Electric Eel Wheel 6 |


Please be sweet and share the love. Leave a comment, subscribe to my YouTube channel, like my Facebook page for regular updates or follow me on Pinterest, Bloglovin' or Instagram


