


Full disclosure - I reached out to John Arbon Textiles and told them about my 'Spinning into Focus' technique. They very kindly sent me a sweater quantity of Slack Ma Girdle from their Appledore range of blended tops to demonstrate my method with.
Last month, I shared the fourth and fifth fibre preparation methods in my Spinning into Focus technique. My idea is that by the end of this blog series, I will have a sweater quantity of different yarns, all spun from the same multi-coloured, commercially available blended top - Slack Ma Girdle from John Arbon Textiles.
The yarns will all have varying levels of colour blending so that I can eventually knit a garment that has the colours appearing to come into focus as they work their way down, up, or across the garment.
The following three techniques use the same blended fibre on a blending board to prepare and spin for an increasingly more colourful yarn. I won't be using the blending board to blend the colours, but paradoxically, as a tool to change the fibres into a format that results in less colour blending.

Full disclosure - I reached out to John Arbon Textiles and told them about my 'Spinning into Focus' technique. They very kindly sent me a sweater quantity of Slack Ma Girdle from their Appledore range of blended tops to demonstrate my method with.

Technique 6: drafting 3 layers onto a blending board and pulling off 3 rolags
Above is the full video demonstration of the following technique.


Once my blending board is full, I draft off 3 thin rolags.

Well, I'm always learning as a spinner, and since I wrote about this technique last year I've learned that if I draft out the blending board rolags before I spin them, it doesn't just reduce the amount of colour blending in the final yarn, but it also makes for a much more enjoyable, relaxing spin as I'm not tugging at all at the fibres while I draft them.

Here's my fluffy mound of stretched-out blending board rolags, ready to be spun.

The singles are definitely showing a lot more of the original colours now...

... but when it's plied, those colours still optically blend together into a yarn that is predominantly a complex brown with some pleasing pops of colour.
Technique 7: placing a single layer onto the blending board and pulling off 3 rolags
Here's a video demonstration of the following technique -
I came up with this technique last year while I was trying to think of ways of avoiding spinning mud and it's still one of my favourite methods - mostly because it's so simple!

Firstly, I break off 3 lengths of blended top that are about the length of my blending board.

Then, one at a time, I open the lengths up until they are about a third of the width of my blending board. I'm trying to get the different colours to sit next to each other rather than on top of each other.

When all 3 strips are spread out across the width of my blending board, I brush them down. Starting from the bottom and working from side-to-side, I zig-zag my way up the blending board, holding the fibres in place above the brush to prevent them from moving about.

I then draft off 3 rolags from the blending board.

Through experimentation, I've learned that thinner rolags like these are much easier to draft from than densely layered rolags. They also result in a lot less colour blending, which is what I'm aiming for here.

The optical blending going on in this image makes me very happy. It's difficult to believe that this blended top is made up of just red, yellow, cyan, and white!

Here are the singles on the bobbin. You can see that the colour sections are brighter and appear to be getting longer, which should result in less muddiness when it's chain-plied.

… and here’s my final chain-plied yarn. Yep, I still love this technique! The final yarn is complex and colourful with a very pleasing amount of marling that’s just muddy enough to tone the colours down.
Technique 8: placing a single layer on the blending board and then rolling off a single rolag
Here's a video demonstration of the following technique -
This method is my second attempt at the only yarn that I classed as a failure when I wrote my first post on attempting to avoid 'spinning mud'.

Instead of adding several drafted layers to the blending board, this time I did the opposite. I placed just 2 strips of blended top on the blending board, opening them up as much as possible so that together they filled the width of the board, and the colours were sitting side-by-side.

I then removed all of the fibre from the blending board in one thick rolag, only drafting slightly to card and align the fibres a little.

When I last tried to spin a rolag made up of the full height of the blending board it didn't go well. I found that the fibres took quite a bit of pulling to draft them out during spinning, and the colours had a tendency to all come out at once; which was not the look that I was hoping for. This time, however, I learned from my mistake and I drafted the blending board rolag out quite a bit before I attempted to spin from it.

Here is the drafted blending board rolag. You can see that the fibres are not particularly well aligned, but the colours are reduced down enough for it to have a serious impact on how blended the colours in the final yarn are. This is also going to draft much more easily while I spin; not as easily as technique 7, but it will be a significantly more enjoyable spin than the last time I tried to spin a rolag made from a blending board full of fibre. That was not fun…

There’s still a complexity to the different colours within the singles but the colour sections are getting longer.


… and here’s the final chain-plied yarn. I must admit to spinning less of this yarn than most of the others as I was concerned that it might end like my first attempt at this technique. I needn’t have worried. The colour sections are significantly longer than any of the other yarns that I’ve spun so far. The colours are much more solid and slightly brighter, but still relatively muted.

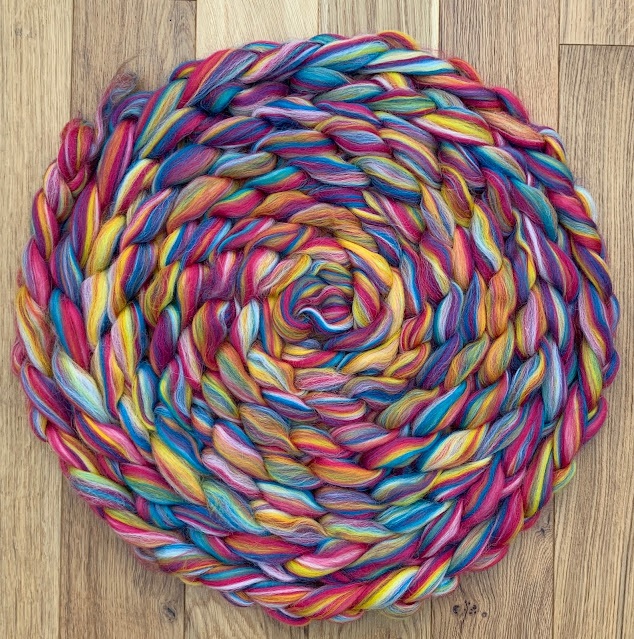
Here are all 3 yarns, prepared on a blending board, side-by-side.

The colour progression between these three yarns is probably the most noticeable of all of my yarns so far and it’s very pleasing. From left to right, the colours are literally coming into focus.
Part of me would like to stop now, but I have one more blog post in this series to come. In my final entry I’ll be sharing the two most popular methods deployed by spinners to avoid ‘spinning mud’.
If you’ve found any of this interesting or useful, please pin this image to Pinterest. It makes a big difference to me and helps other spinners find it too.
I'll be uploading a video version of each technique to YouTube. If you'd like to be informed whenever I publish a new spinning video, please subscribe to my channel here.
At this point, I normally suggest similar related blog posts, however, my list of spinning-related content is becoming a little unmanageable... If you'd like to read more blog posts about spinning and fibre preparation, please take a look at this page here where you will find links to all of my spinning and fibre articles.
Thank you for reading, and happy spinning!
---


----------
Please be sweet and share the love. Leave a comment, subscribe to my YouTube channel, like my Facebook page for regular updates or follow me on Pinterest, Bloglovin' or Instagram
1 comment:
This is fascinating! I just read all of your posts on spinning into focus. What a cool idea! I’ll have to refer back to your posts when I get around to spinning another sweater quantity of wool. Thank you for all of your posts!
Post a Comment