


Chain-plying (also known as Navajo plying, or N-plying) is a brilliant technique for spinners to have at their disposal. Being able to pull this plying method out of the bag makes spinning a finished 3-ply yarn more efficient, and significantly increases your spinning repertoire.
When you chain-ply, you are creating a 3-ply yarn from one bobbin full of singles. You are effectively making a series of super-long crochet chains before the singles enter the wheel or spindle for plying. Whether you decide to chain-ply at the wheel, or make a chain-plied ball first can have a dramatic effect on the appearance of your finished yarn.
Chain plying at the wheel shows off the colours in hand-painted top and keeps them cleaner looking and relatively separated -
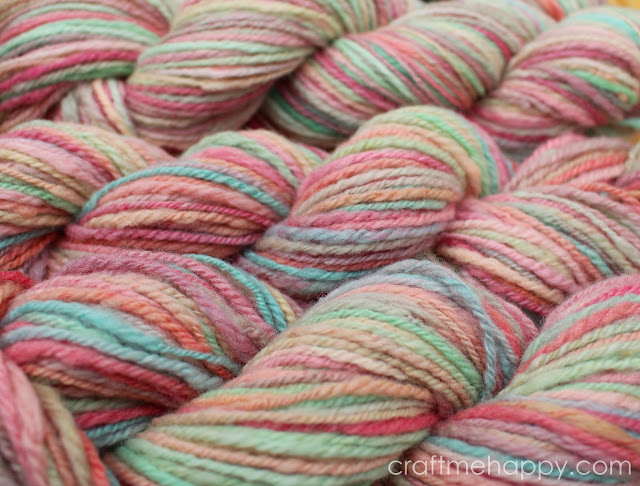

I wanted the yarn to be recognisable as the fibre that she had just spent a good hour squirting with food colouring. If I’d plied it with itself, the pink/green and orange/blue combinations would have muddied the colours and would probably not have produced the pretty pastel yarn that she was very happy to wear in scarf form.


Chain-plying is also a wonderful way of getting the maximum amount of yarn out of a precious or expensive fibre. These yarns were spun from the undercoat of an Alaskan Malamute. The dog owner wanted a memento of her elderly pet that she could hold onto in the years to come. It's almost impossible to spin two or three bobbins of singles that are exactly the same length in order to ply them and have nothing left over. By chain plying you know that there will be virtually no wasted singles, and every inch of spun singles has been turned into a finished yarn.
Of course, chain plying is also a great way of clearing your bobbins of leftover singles when you've finished spinning a traditionally plied yarn - creating even more yarn to add to your stash!
There's no denying that chain-plying at the wheel takes a little practice and co-ordination. Looking at the hand-painted yarn above, I can see how much my chain-plying has improved since then, and it's only really clicked in the last couple of years.
Chain-plying at the wheel

Spinning is fundamentally about being in control of the twist entering your fibre, and it is exactly the same for plying singles.
In this animated gif, you can see that with my left hand I create a loop with my finger and thumb, and hold onto the yarn that I'm going to pull through on top of my thumb. When I'm happy with the amount of twist that has built up in the plied section, I pinch the singles at the point where the twist is about to enter the plying zone, hook the next loop of singles through with my thumb and, at the same time, extend the size of the loop by pulling the group of 3 singles towards the wheel.
By maintaining control of the twist at all times, and keeping good tension, I minimize the size of any little bumps that might form where the loops begin.
I wanted to show a close-up of my technique for chain-plying, so my loops are relatively small. However, when you chain-ply at the wheel, you will always be limited by how wide you can comfortably stretch your arms.
Pre-chain-plying by making a plying ball
I became intrigued by the idea of pre-chain plying my singles because I do struggle with stretching my arms out. Chain-plying was always quite an ordeal for me, so when I learned that spindle spinners often pre-chain-ply their singles into a plying ball, I knew that this was something I wanted to learn more about.
Here's a video I made when I was pre-chain-plying the malamute singles to show my setup. I've since learned that I prefer to wind it onto a squashy ball of waste yarn, but the principle is just the same.
Making a Chain-plied Ball with Rainbow Singles
The idea for this blog post came about because I’m currently in the middle of spinning a rainbow yarn to make the final element to go on my Joyful Wreath.
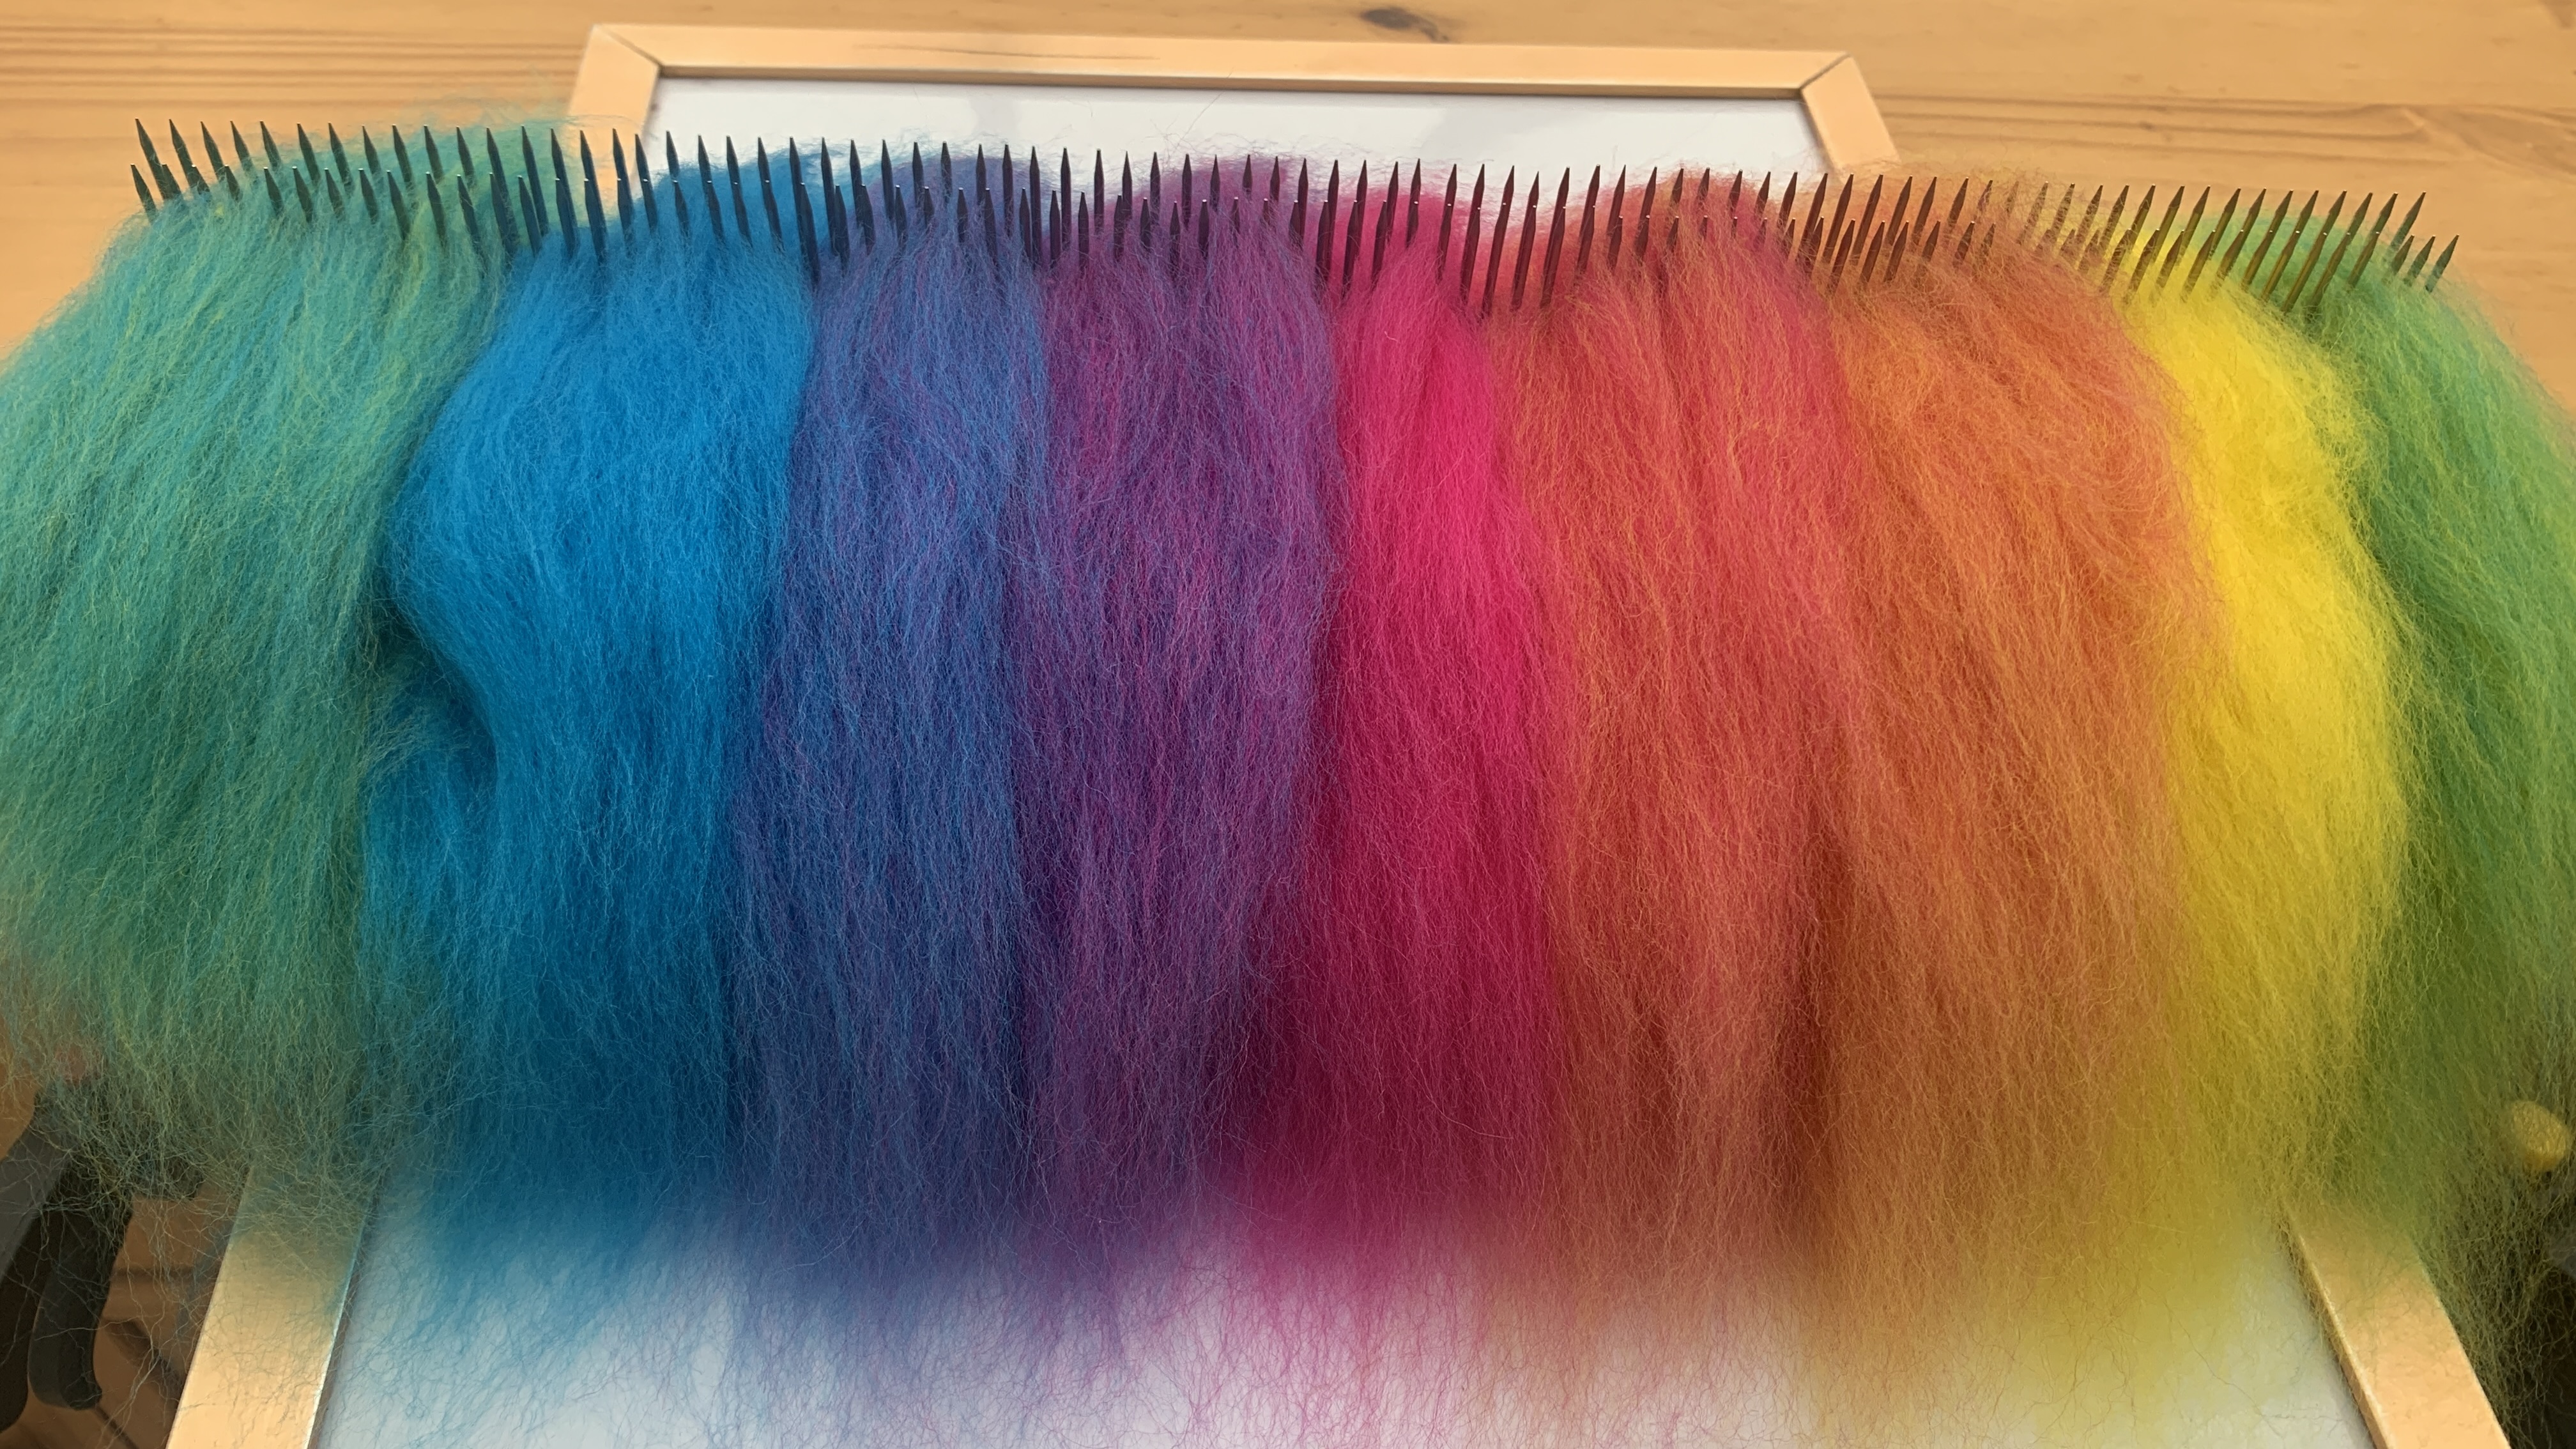
To prepare the fibre for spinning I arranged all of the blended colours on my hackle…
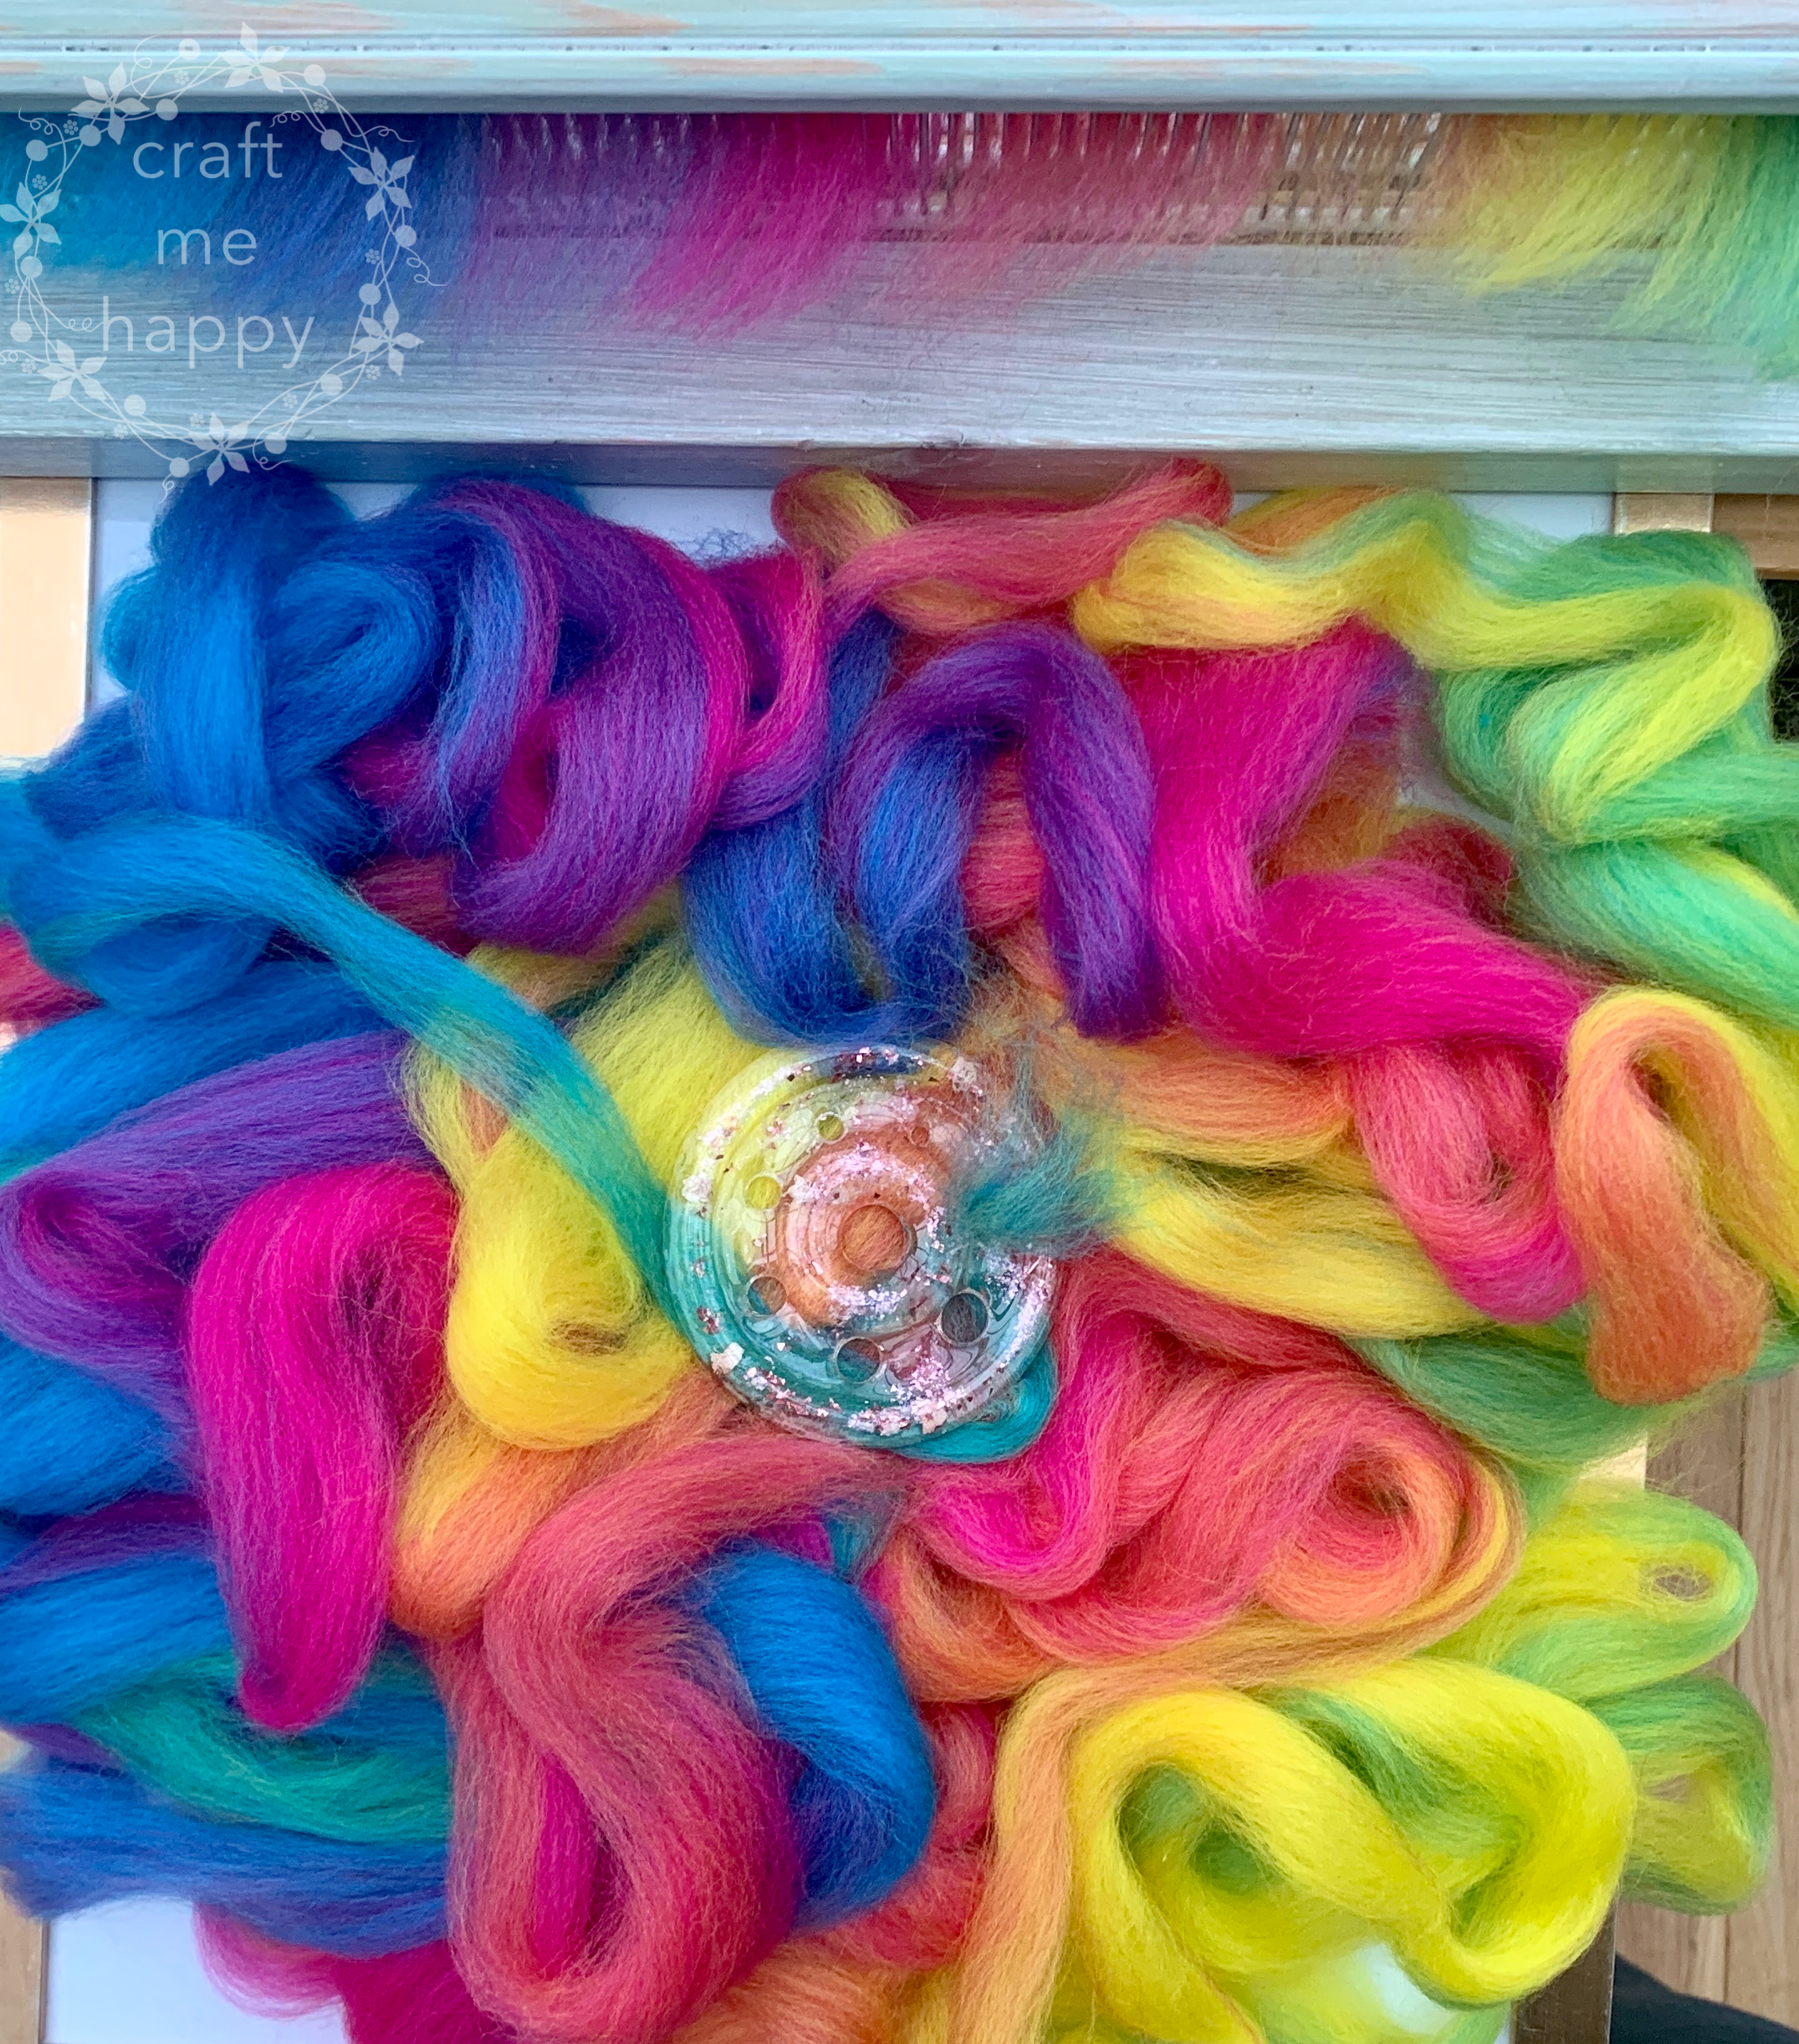
… and then drafted them off into a thin, pulled top, moving quickly from right to left, and back again until I had a variegated top with relatively short colour transitions.
All the time I was spinning the first batch of fibre I was trying to decide whether I should chain-ply it at the wheel to get bold, vibrant, unblended colours, or whether I should make big, long chains to get complex, marled colours.
I decided to do both and see which one I preferred.

To begin chain plying, whether it’s at the wheel or with a chain plying ball, I first make a slip knot in my leader yarn. In this instance, I’ve wound a ball out of some cheap, commercial yarn until it’s a little bigger than a golf ball.
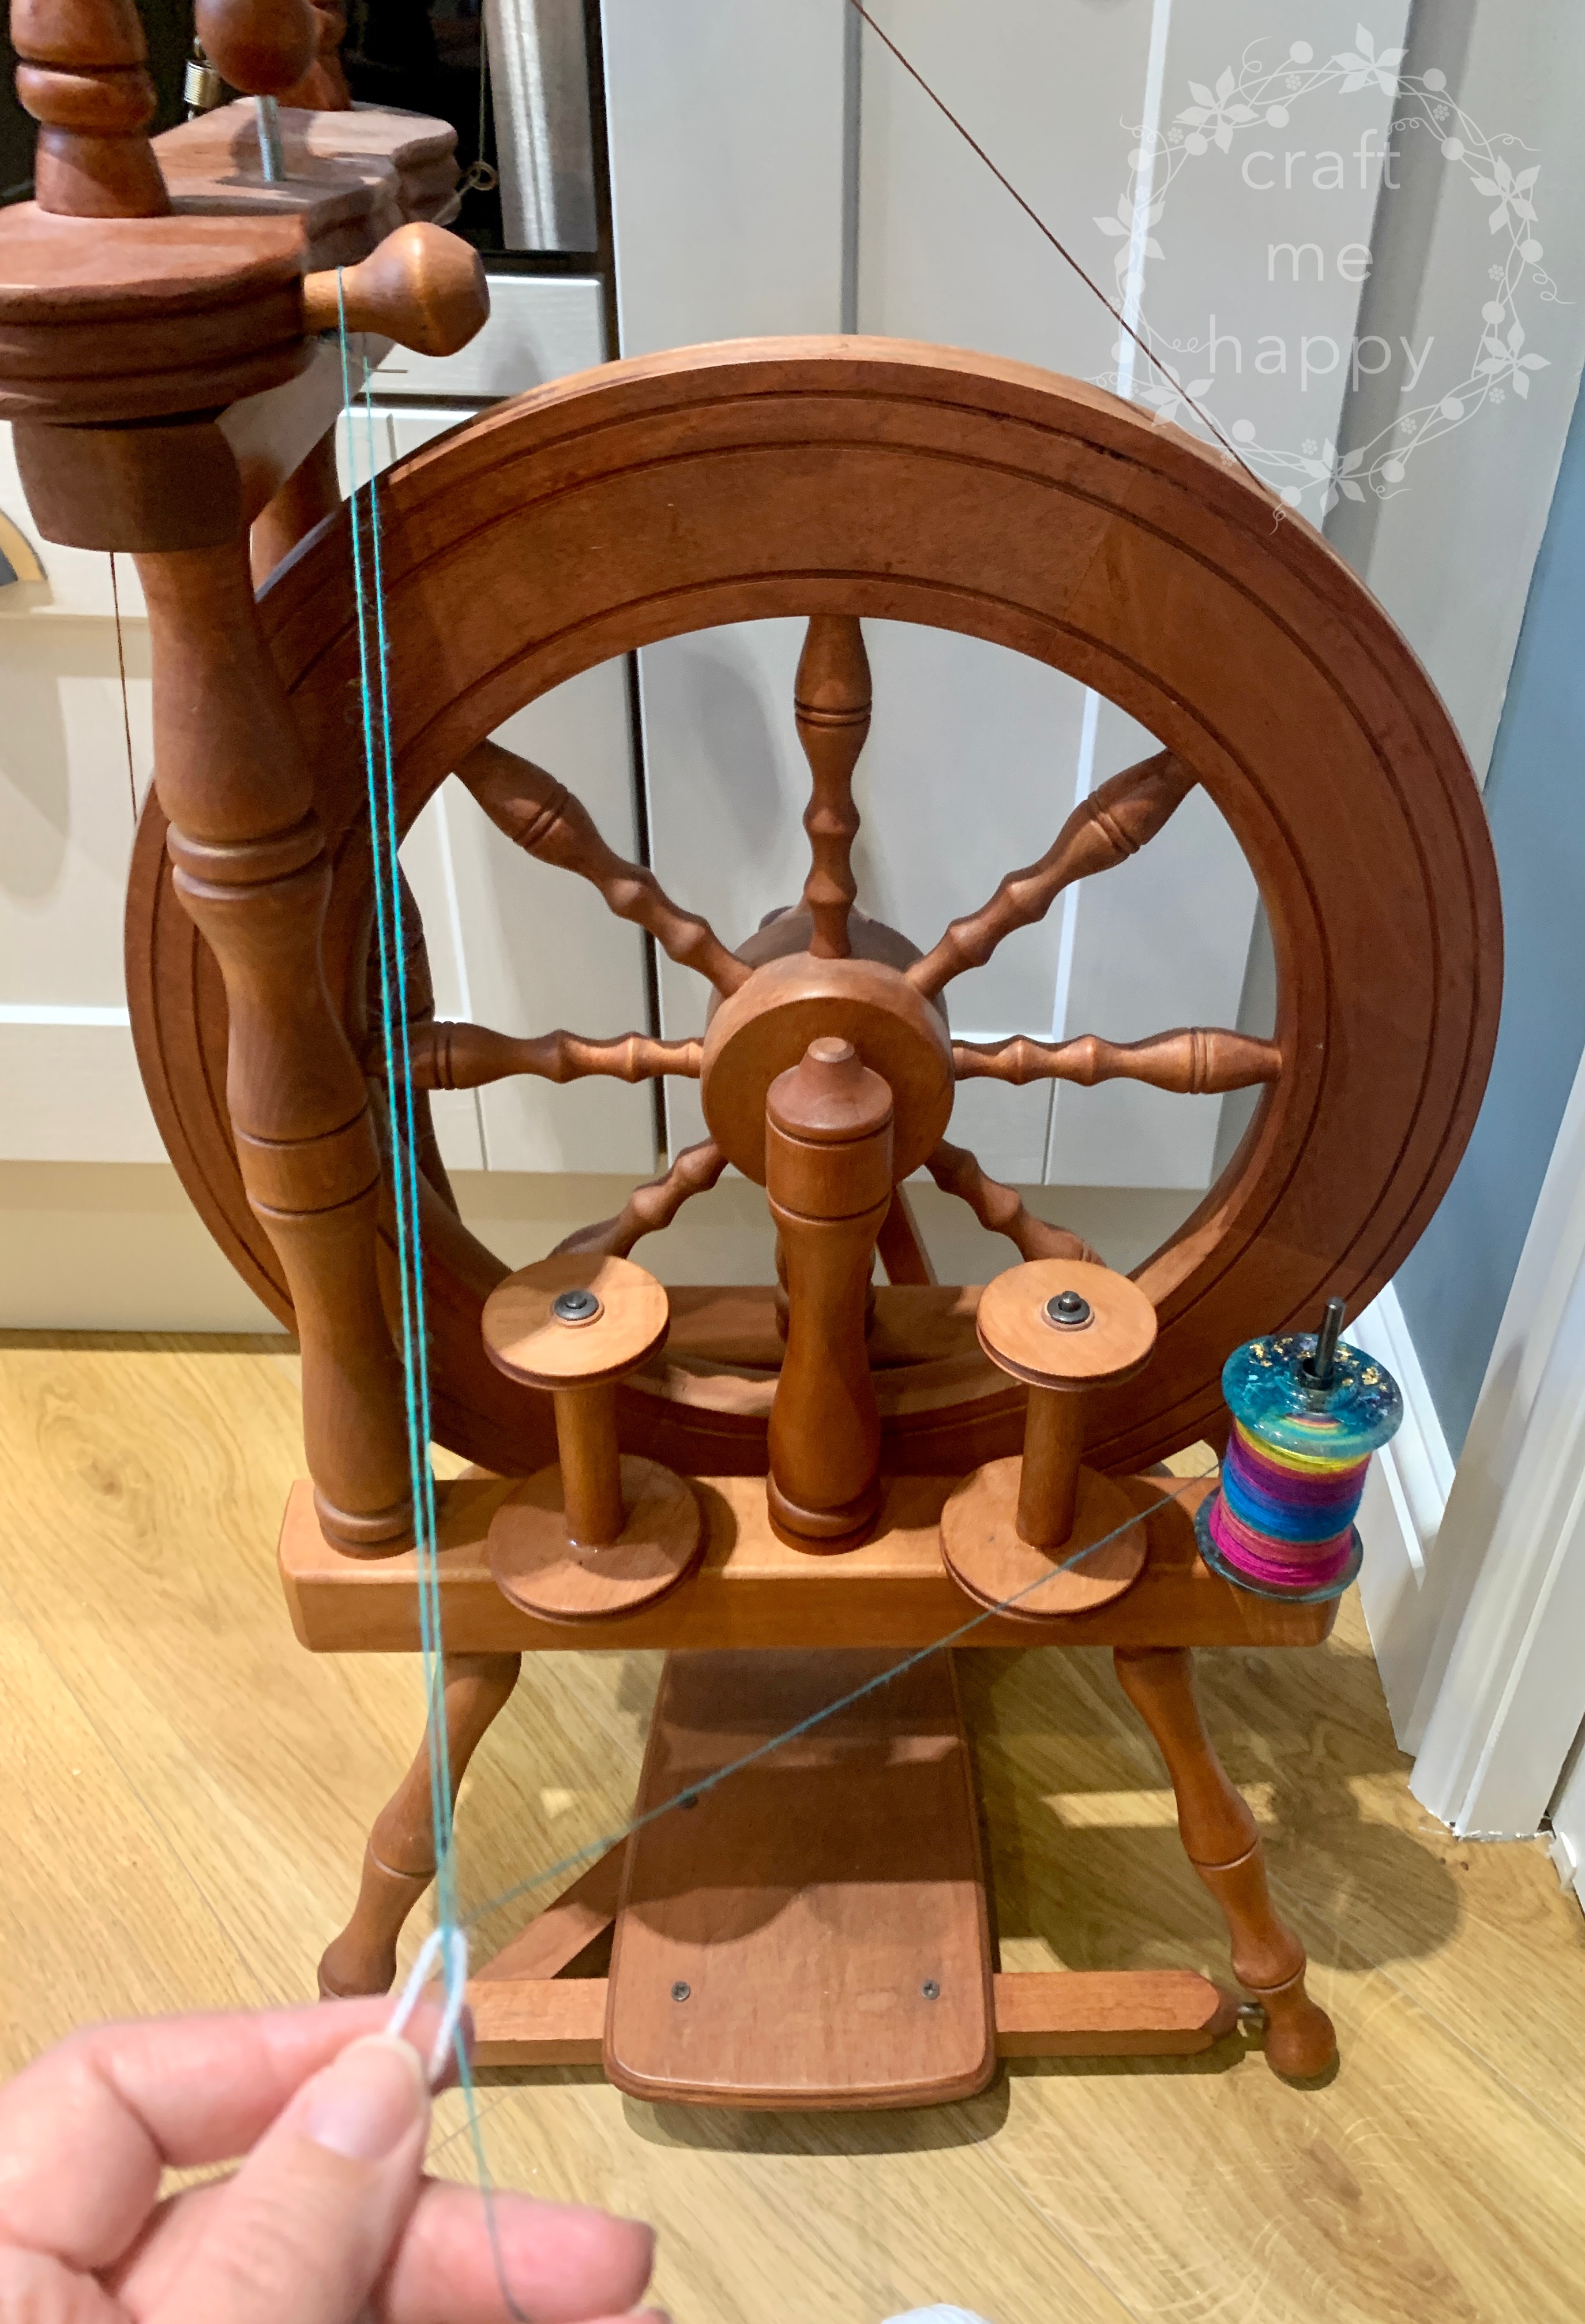
I use my Ashford Traveller spinning wheel to help me to make a chain-plying ball, but you can use a lazy Kate, combined with anything that you can hook a yarn loop around. In the past, I’ve hooked my loop around a door knob, or around the orifice reducer on my Nano, but you can also use any kind of smooth, vertical pole.
To begin, I sit my bobbin of singles on the lazy Kate and bring a loop of singles through the slip knot in my leader yarn. Still holding onto the end of the singles, I then pull the loop through and hook it around the brake tension knob on my spinning wheel.

At this stage, I’m just concerned with securing the unplied singles to the plying ball. I’ll move on to making much bigger chains later on.
For this first chain, I hook the singles coming from the bobbin around the tension knob so that I’ve got all 3 strands coming from the same point.
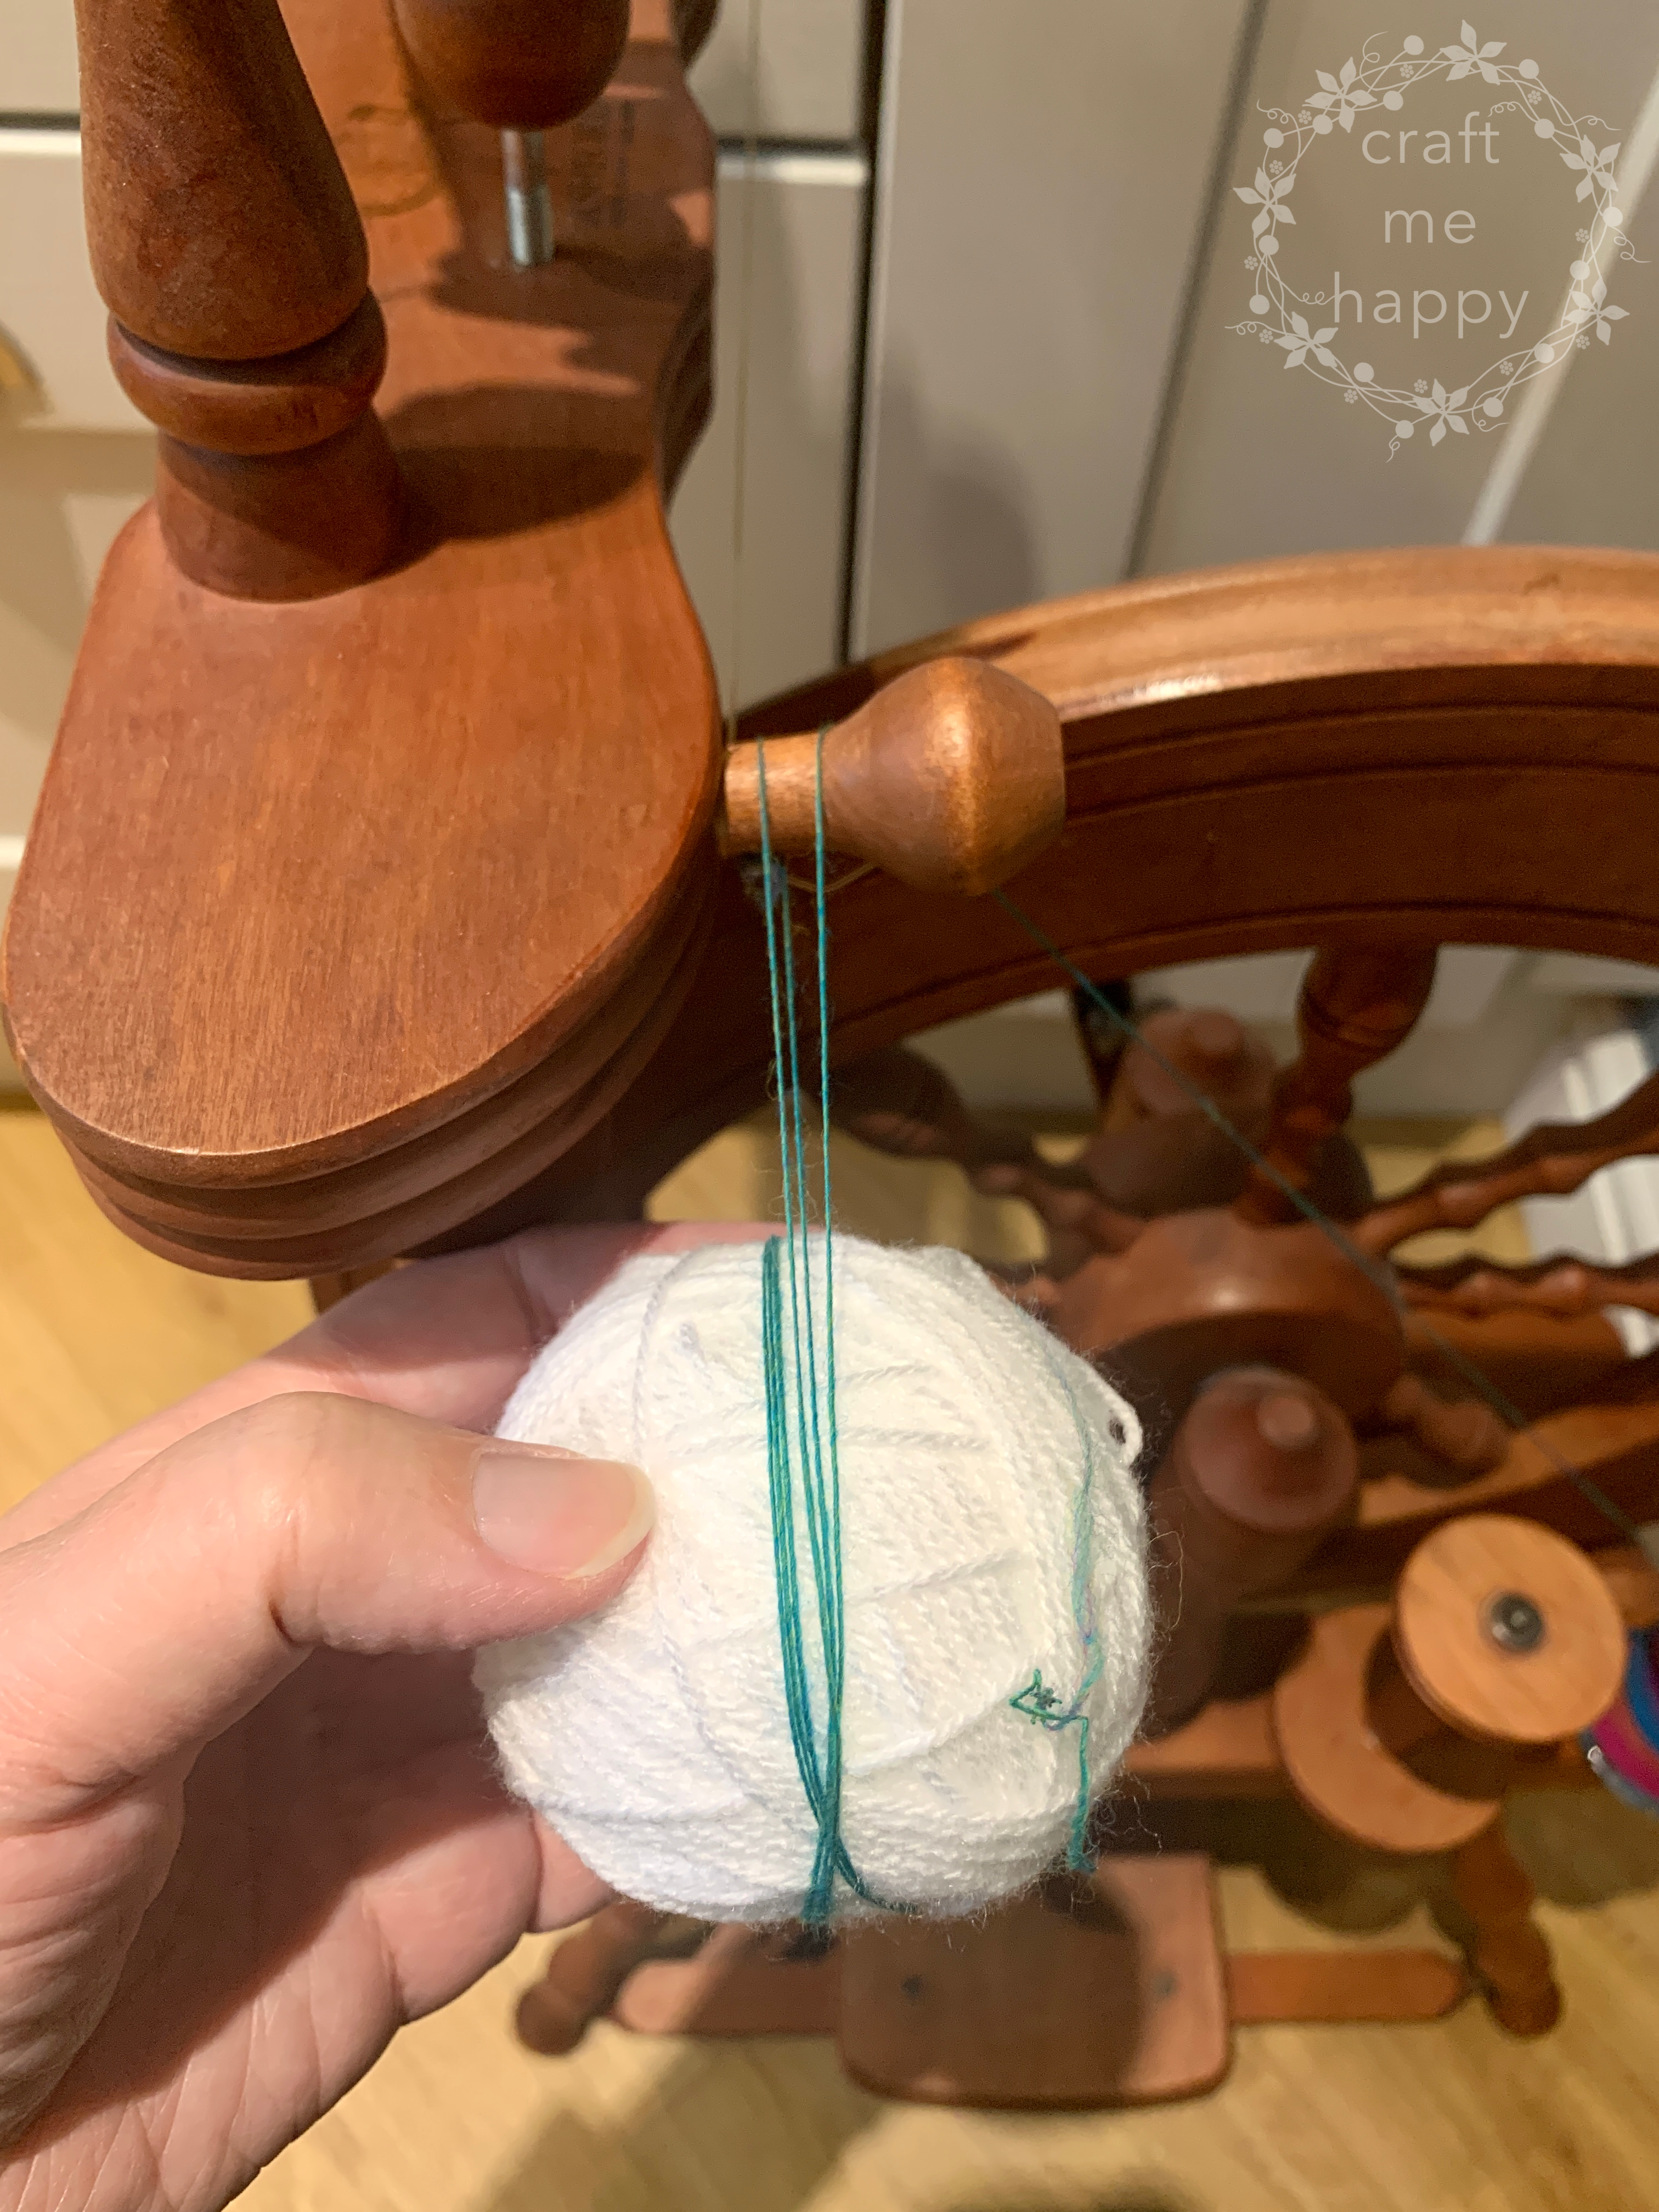
Now I secure all 3 strands to my plying ball by wrapping them around until I reach the loop.
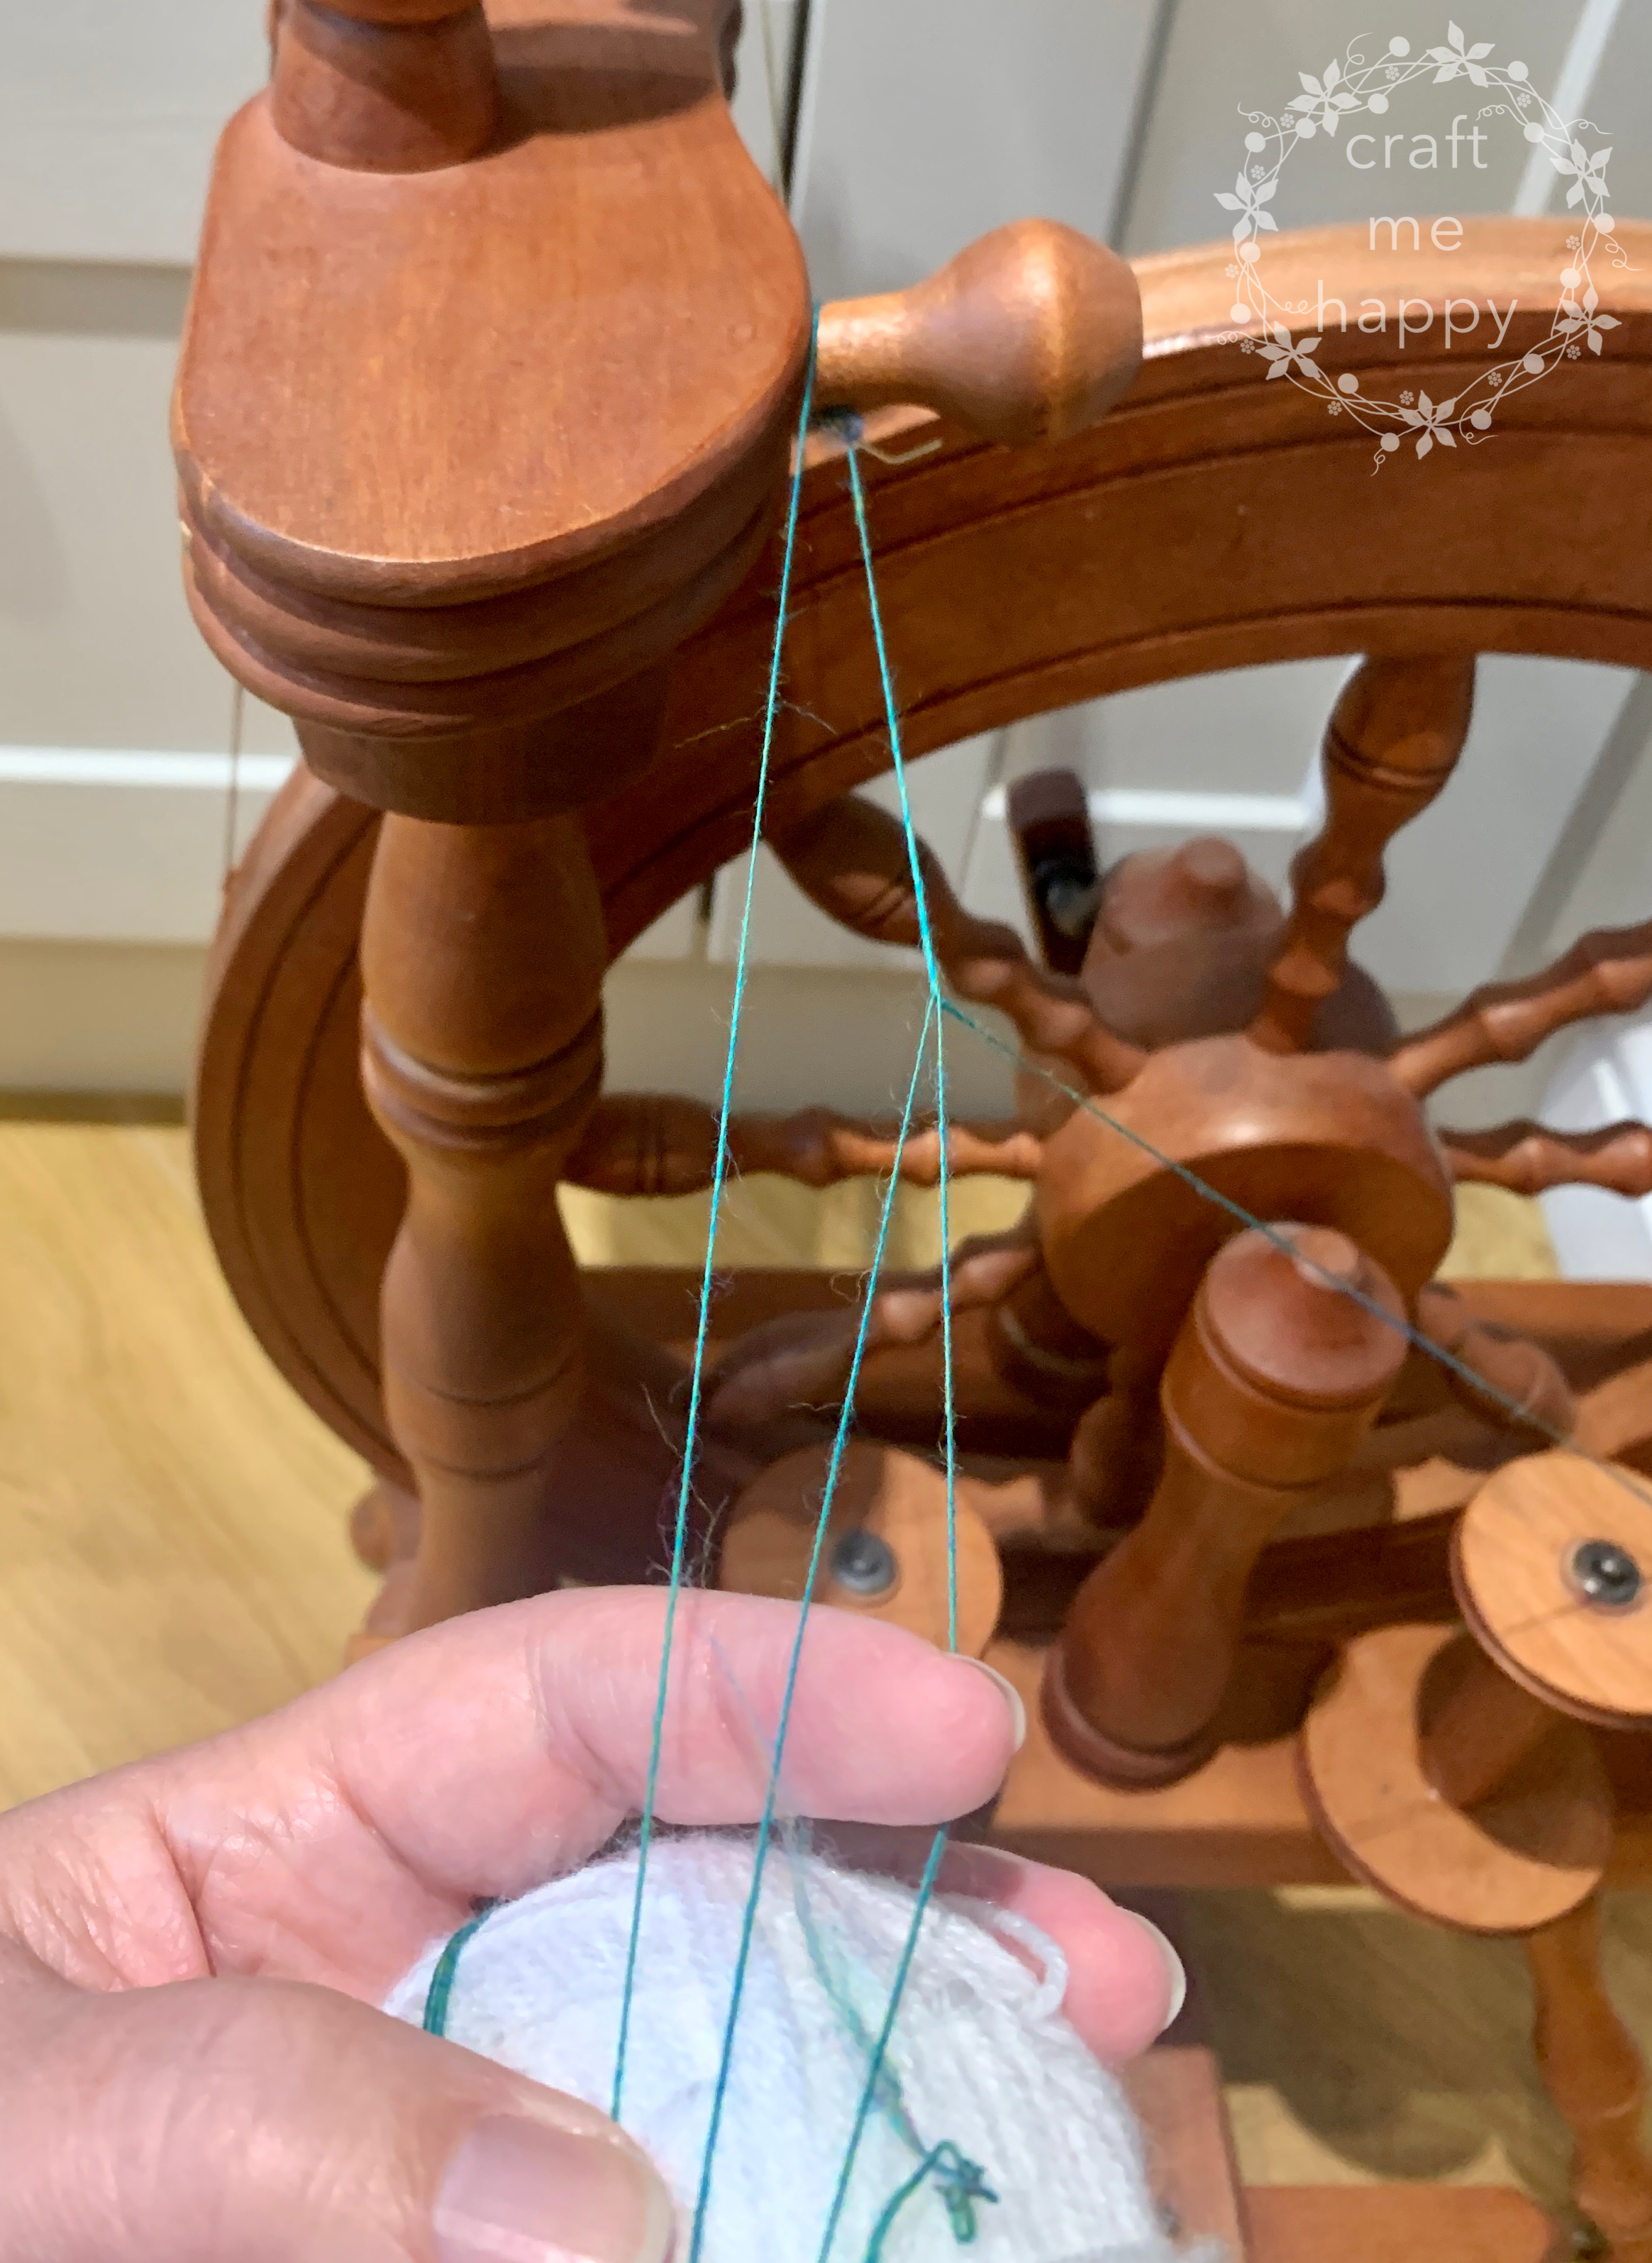
At this point, I reach through the loop, and pull the yarn coming from the bobbin through the loop and hook it over my tension knob. With the same movement, I remove the original loop. The singles on the bobbin are now free to extend while I move backwards from the wheel. (Unfortunately, with both of my hands full, I can’t quite get an image of me actually pulling the loop through, but hopefully you’re still following along with me!?)

Now, I can just keep walking back and back, pulling the yarn from the bobbin with my right hand, making the chain plying loop longer and longer with each step.
I’d like a bit of barber poling so that each strand has at least two colours in it - but not so much that the colours become muddy. The beauty of pre-chain plying with a plying ball like this is that you can really take control of where your colour transitions fall, and just how much barber poling the final yarn will have. I’m really only limited by the size of my room.
In the image above, I was creating a 3.5 metre chain loop…

… but occasionally I felt a 5.5 metre chain loop was necessary - it all depended on what colour I was pulling through at the time or how long the colour sections were.
When I reached the chain length I wanted to create (or the end of the room, whichever came first) I walked back to the wheel, winding the 3 plies onto my plying ball and keeping good tension throughout. Every time I reached the tension knob that my chain loop was hooked over I removed the loop and pulled the singles from the bobbin through.
When I could see that the bobbin was getting low, I kept a close eye on it, shortening my walk back so that I was able to make sure that the end of the bobbin didn’t extend much past the final loop.

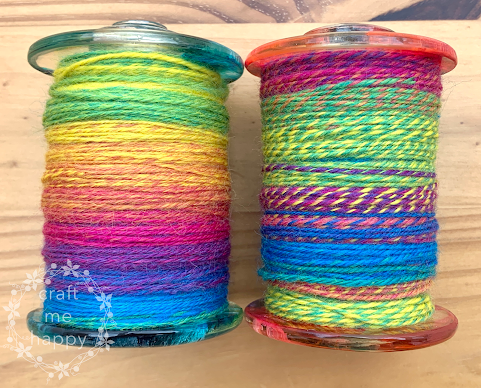
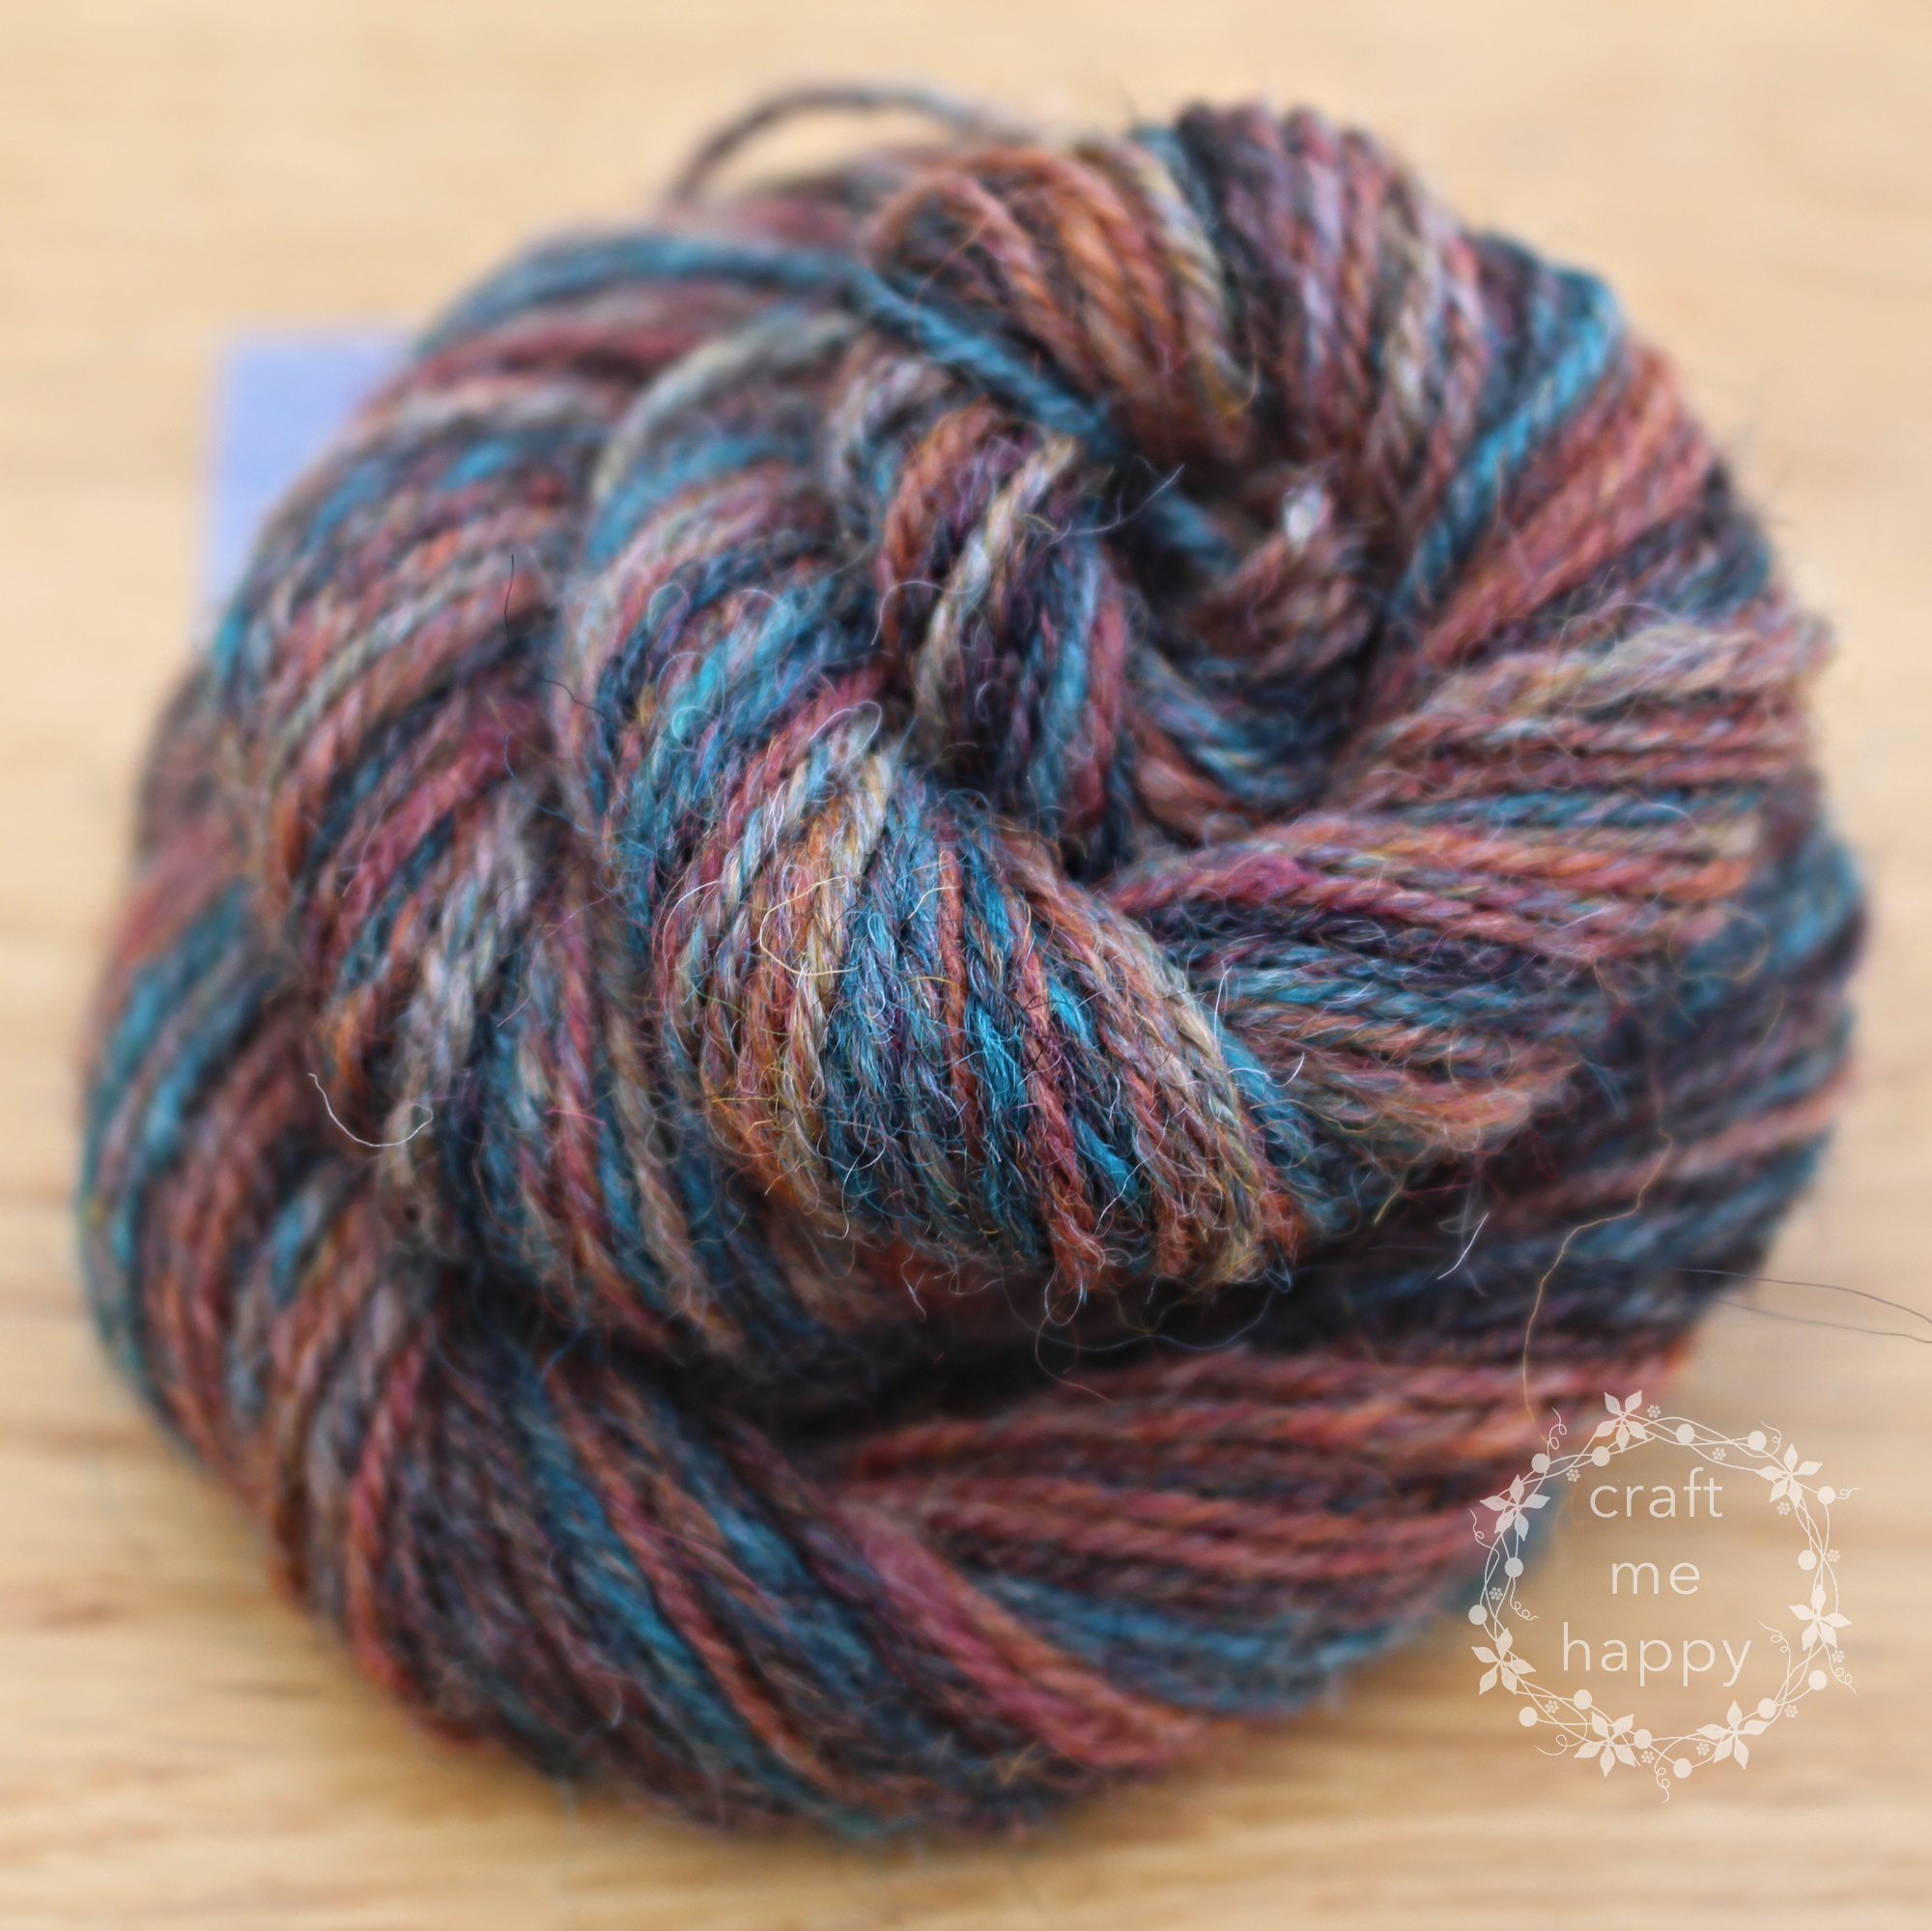
Here’s my plying ball of rainbow chain-plied singles. All I have to do now is run it through my spinning wheel in the opposite direction.

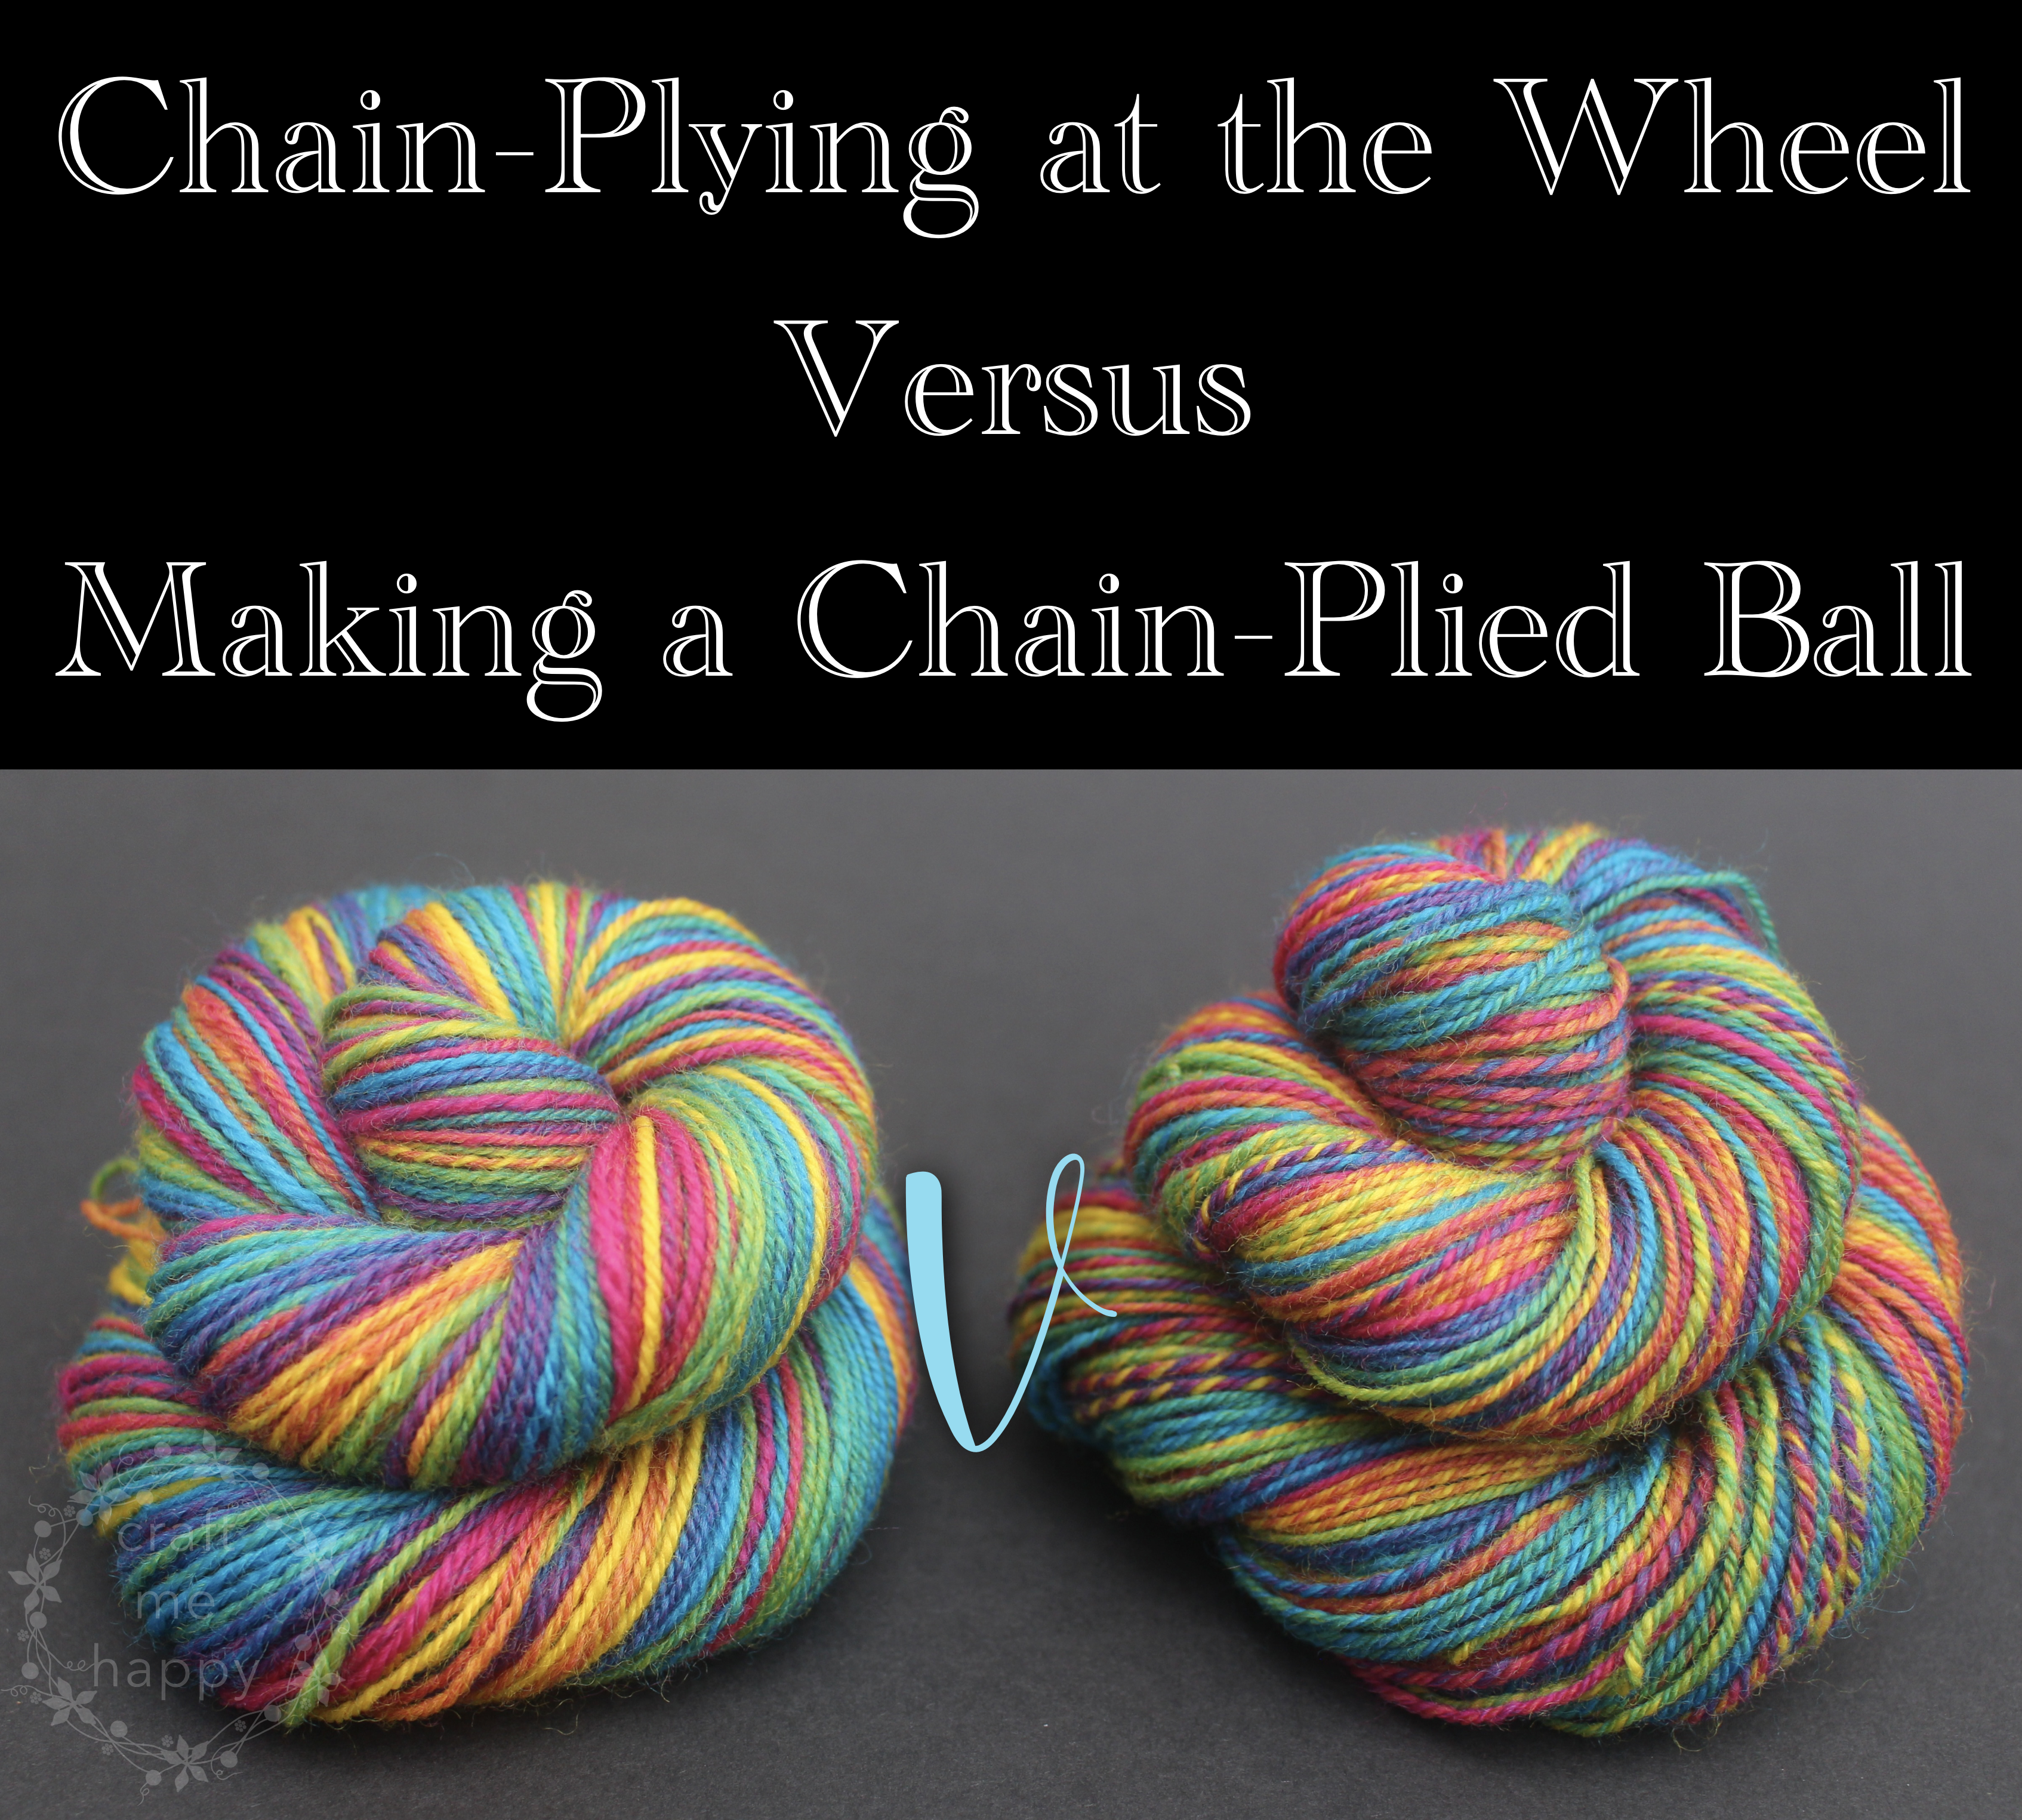
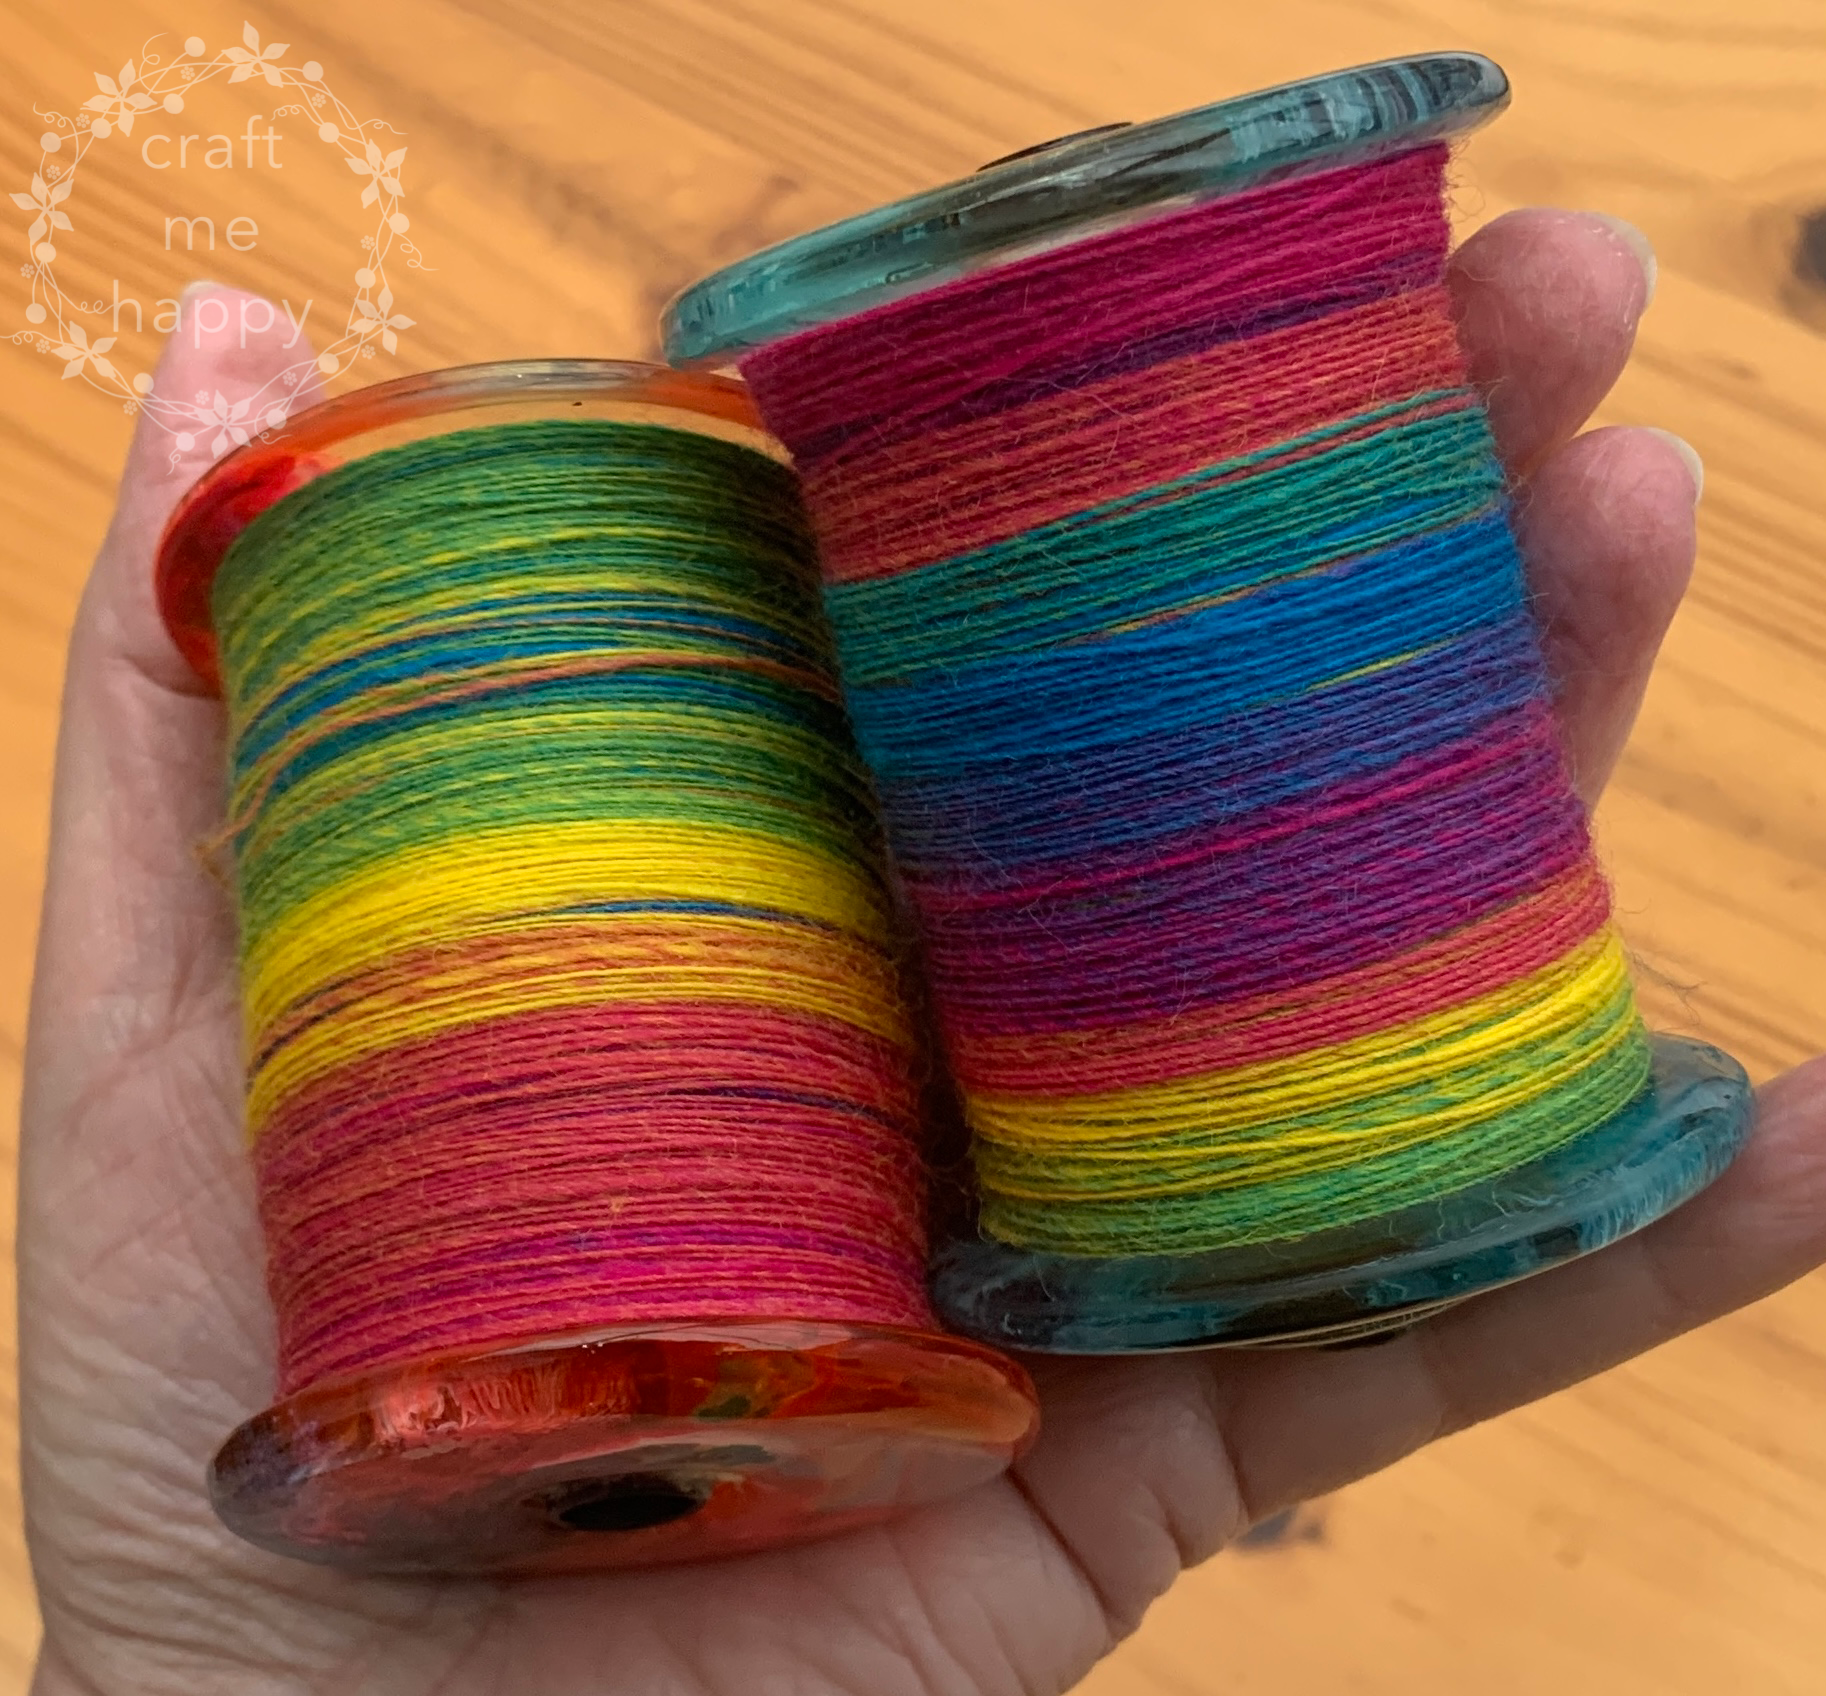
Here, are the two chain-plied yarns, just before I wound them off to be soaked. The first was chain-plied at the wheel, and the second was pre-chain-plied.

... and here are the two finished yarns, side by side.

The colours in the yarn chain-plied at the wheel are really well-defined and have maintained their brightness...

... while the colours in the one pre-chain-plied are much more marled, complex and interesting. The final colour sections to come off my hackle were much shorter than the earlier ones, which is why the final layer of yarn has much more barber poling, but I think this only adds to the complexity.
Which do you prefer? I seem to be much more drawn to the second, pre-chain-plied yarn. I can't stop looking at it!
Summary
There is definitely a place for both chain-plying techniques, and I'm learning when it's better to chain-ply at the wheel, and when I need to make a chain-plied ball first.
The yarn above, for example, was crying out to be plied with very short chains. If I'd made a plying ball with chains several metres long, there would have been a lot more optical blending, and it would have just turned to mud.

It's worth mentioning that some people consider a chain-plied yarn to be weaker than a regular 3-ply yarn. Possibly because the chain loops can create bumps along the yarn, which might become points of wear, or because it's spun from a single bobbin of yarn, so if one strand fails, the whole yarn is compromised. I've never observed this, but it would definitely be an argument for pre-chain-plying for spinning sock yarn. In the past, I've created 12-metre-long chains using the pre-chain-plying method, which should, theoretically, create fewer points of weakness in the yarn.

Making a chain-plied ball also makes the plying process easier when you have limited space around you. I made this plying ball while we were away on holiday. I used my modular lazy Kate and looped the yarn around the orifice reducer on my Nano 1.1. This meant that I was able to ply the yarn in the passenger seat while we made the long car journey home. I would never even attempt to chain-ply using the traditional method while I was in the confined space of a car seat. It would not end well!
Thank you so much for visiting my blog. If you’ve found this post interesting or useful, please pin it to Pinterest. It really does make a big difference to me and helps other spinners find it too.
At this point, I normally suggest similar related blog posts, however, my list of spinning-related content is becoming a little unmanageable... If you'd like to read more blog posts about spinning and fibre preparation, please take a look at this page here where you will find links to all of my spinning and fibre articles.
Thank you for reading, and happy spinning!
Other Spinning-Related Blog Posts

 |
| 9 Different Ways of Spinning a Multicoloured Blend While Trying to Avoid 'Spinning Mud' |


 |
| Spinning a Complex Fractal 3 Ply Yarn |

----------
Please be sweet and share the love. Leave a comment, subscribe to my YouTube channel, like my Facebook page for regular updates or follow me on Pinterest, Bloglovin' or Instagram
4 comments:
how clever. I wonder if it would be possible to use a warping board instead of walking across the room, I'll have to try it out some day :)
Thank you for this helpful comparison! I've always struggled with chain plying, but your method at the wheel makes it seem so much more manageable. Excited to try it out! Nutrient Innovation INC
I love how chain plying at the wheel gives more control and consistency to my yarn, resulting in beautifully textured and vibrant projects every time! Nutrient Innovation INC
Thank you for the detailed explanation of the chain plying ball. I’d never seen it before I taught myself to chain ply about 8 years ago while doing an 11 day stint as the spinner for the Florida Strawberry Festival. I used YouTube videos. Now I use it on the vast majority of what I spin. As most of my yarn is of varying textures, I don’t notice the lumps. I’ve used the yarn in my knitting and some on a continuous strand weaving loom. For anyone who is looking to learn this method, have fun with it.
Post a Comment