


In March this year, I began one of my biggest projects yet - my Joyful Wreath. It was very much inspired, both by Attic24's Christmas wreath, and Ingrid Fetell Lee's observations on the Aesthetics of Joy.
This year, I'm taking my 50th trip around the sun and, having a December birthday, I thought it would be kind of exciting to have a big project that broke down into lots of little projects that I could work on throughout the year, with a final reveal on my 50th birthday.
I've been writing my blog for over 16 years now, and in that time I’ve written tutorials on many different crafts. I thought it would be a fun idea to revisit some of those projects, as well as introduce a few new ones, and incorporate them all into one, mad, crazy, joyful wreath.
So, happy birthday to me!
I honestly had no real plan, or idea of how the finished wreath was going to look, I just knew that if I kept to Ingrid's formula for a joyful aesthetic and had enough elements on there for it to look abundant and busy, everything else would come together.
This was the checklist that I followed that helped to inspire me -
- Bright, saturated colours
- Elements from nature
- Circles and coils
- Busyness and an abundance of repeated motifs
- Weird or quirky details
- Objects that float, fly or can be seen in the sky eg. confetti, bubbles, birds, butterflies, rainbows, stars…
- A mixture of texture and scale.
Building the Wreath
For fun, I made a time-lapse video of me pinning all of the elements onto my wreath before I sewed everything on in stages. If you'd like to learn a little more about my process, read on...

You can see how I knitted the base for my wreath here.
Using my handspun rainbow yarn, I crocheted the wires around some smart fairy lights and wrapped them around the wreath base to look like swirling party streamers. I intended for them to be almost covered, so I was really just interested in having an even distribution of lights around the wreath.

The main focal point, and the object that inspired the arrangement of colour on my wreath was the knitted rainbow that I sewed to sit inside the base of my wreath.

In the last few weeks, I've been laying all of my wreath elements onto the base and trying to decide how to arrange them. It all felt kind of 'bitty', as if it needed another element that was as big, if not bigger than the needle-felted flowers. I also felt as if it needed a little more whimsy to give it more of a childlike, feel.

My 14-year-old daughter loves collecting things with images of mushrooms or toadstools on them and it's definitely a motif that I'm seeing around a lot recently. I thought it would be cute to work out a knitting pattern for a toadstool, and knit a spectrum of them with the remainder of the rainbow yarn I spun recently. I'll probably write up the knitting pattern for the toadstools in the future, but for now, that's a future me problem.
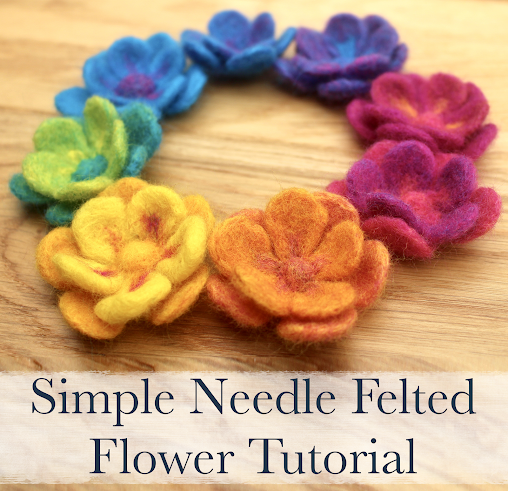

Once I’d pinned the needle-felted flowers, and knitted toadstools on, I sewed them on with a long beading needle and some thread. I added extra beads to the flower centres to hide the stitches.

I then pinned and sewed the knitted curlicues in place.

I’d knitted 24 of them, so I placed them in spectrum order which helped me to space them evenly all the way around my wreath. I felt that they looked better hanging off the sides so I pinned them around the inside and outside edges, and then sewed them in place with some wool yarn, the same colour as my wreath base.

After sewing on the curlicues, I added needle-felted beads to the larger gaps on the wreath. I used a long, sharp wool needle to sew them to the base with a single stitch.
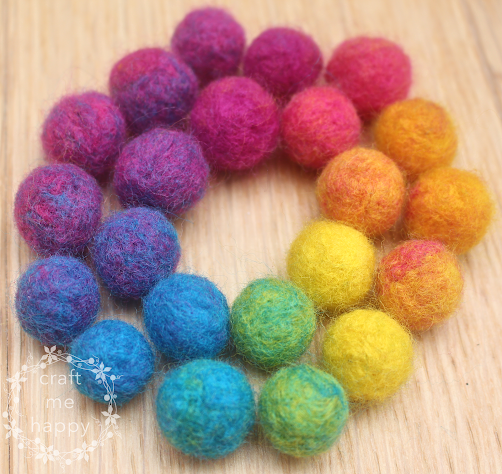

Pulling the yarn through quite tightly created a little dimple in the middle of the felt beads, giving them the appearance of colourful berries which was very pleasing.

Following on from the beads, I added the layered singed flowers using a very long needle and complementary sewing thread. I’d made the singed flowers out of leftover fabric and so some of the colours weren’t as saturated as I would have liked them to be. As I wanted the design elements to carry around the sides, I just put the less brightly coloured flowers on the inside or outside of the wreath so that they just added to the busyness of the design without being front and centre.

The final step in assembling my wreath was to fill any obvious gaps with silk top pom poms.
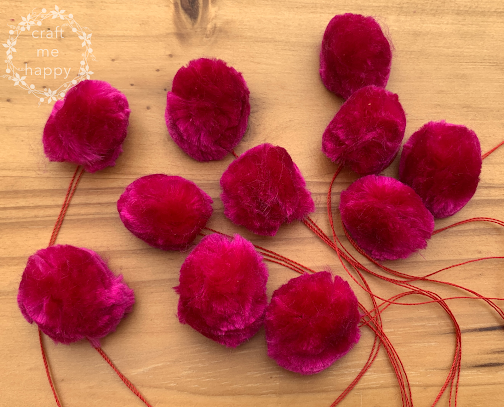
This was really when the whole wreath started to come together and I got a genuine feeling of more is more. I’d left long tails on the pom poms, which made them really easy to attach to the base. I just threaded the ends through, one at a time, and then knotted them together at the back.
I’ve never thought of myself as a maximalist, but the more I was adding to the wreath, the happier I became! It took me 3 days to sew everything on, but my motivation to finish my wreath was strong.

Oh. My. Goodness.
I’m so happy with it!

Every time I look at it, it fills my heart with joy. This is definitely not just going to come out at Christmas!

Well thank you so much for reading, and following along with my bonkers project. If you’ve found any of this interesting or useful, please pin it to Pinterest. It makes a big difference to me and helps other crafters find it too.
Recommended Blog Posts -


 |
| Crocheting Around Fairy Lights |


----------
Please be sweet and share the love. Leave a comment, subscribe to my YouTube channel, like my Facebook page for regular updates or follow me on Pinterest, Bloglovin' or Instagram
No comments:
Post a Comment