


My goal is to try to post one repeating wreath decoration a month, with a final reveal in December. Some of the wreath motifs will be new to my blog, while others will be an updated version of a popular craft tutorial.
Although I now seem to write more about spinning than anything else these days, one of my most popular blog posts dates back to 2014, when I shared how to make these easy needle felted flowers.

It’s regularly in my top 3 most visited posts and it gets pinned to Pinterest on an almost daily basis. Their small size and cheery colours make them the perfect addition to my Craftmehappy Joyful Wreath.
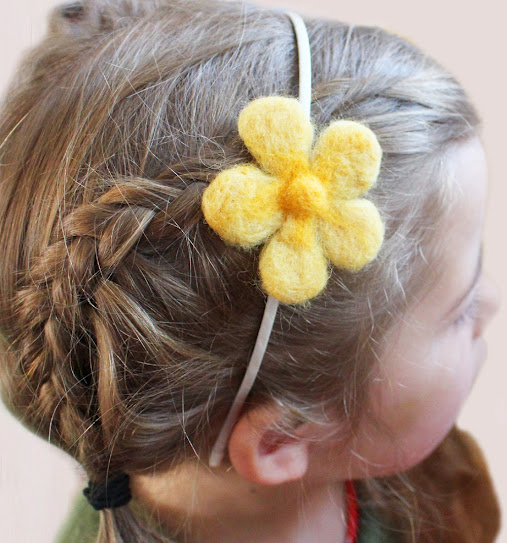
Alternatively, they look cute on a headband, hair clip, or brooch, or they could be strung onto a garland to decorate a child’s bedroom.

I’ll be layering them this time and showing how they can be shaped to be slightly more realistic.

When I combed the merino fibre to spin the rainbow yarn for my curlicues, I was left with quite a bit of short waste fibres that are perfect for needle felting. The flowers can, of course, be made from any coloured wool fibres that are suitable for needle felting.
Materials used to make 3 Dimensional Needle Felted Flowers
This blog post contains Amazon affiliate links to similar products that I purchased myself to make the Needle Felted Flowers. If you click through and purchase, I will receive a small percentage of the purchase price at no extra cost to you.
- Wool tops, roving, sliver, or carded wool fibre. In the UK, World of Wool or Wingham Wool both stock a wide range of wool colours suitable for needle felting.
- Felting needles
. A lot of needle felters use heavier gauge felting needles to begin with, and then gradually reduce the width of the needles so that the holes become less prominent as the piece is finished. For these flowers, I used a single size 38g regular triangular needle for quickly bonding the fibres together, and then a finer, size 42g needle for gentler felting. I frequently hold 3 finer needles together for speed.
- Thick foam
or felting brush
to felt on. I bought both my felting mat and needles from Heidi Feathers in the UK
- Carders or wool combs are optional, but they do help with blending colours and seperating the fibres before you begin felting.
- Flower cutter shapes. I use these sugar flower cutters
as they're sturdy and there's a ridge of plastic to hold onto and protect your fingers. They come in a set of 3 and I used the medium and small cutters for this project.
If you prefer, I've also made a video to accompany this blog post showing how I made these needle felted flowers.

Firstly, stuff your medium-sized sugar flower cutter shape with wool. I like to fold the fibres into the tips of the petals, allowing the wool ends to pass through the flower centre. I'm not going for realism and I find a thicker flower is easier to handle and felt than a more delicate one.

Stab the fibres all over with the 38 gauge needle. This first pass gives you an idea of how thick the petals are going to be. If it seems a little thin in places, you can add more fibre.

Next, I like to hold 3 x 42 gauge needles together. Stab it repeatedly all over until the fibres start to flatten down. The fibres will be slightly attached to the felting mat, so to prevent them from becoming too stuck, I lift the flower and cutter off and turn the flower over.

Here's how the flower looks after being stabbed all over. It's lightly bonded together but it's very fragile at this stage and could easily come apart.


When the flower feels nice and solid, I like to neaten the edges. I do this by lifting stray edge fibres with the side of the felting needle and stabbing them into the petal. This also helps to strengthen the petal edges.

Here you can see that the outside of the petals are slightly thicker, as the very edge fibres have been needled into the outer few mm of the flower

This is going to be the bottom section of the layered flower, so it won't have as much detail as the upper flower. At this stage, I want to make the petals curl up a little. To do this I repeatedly poke my 3 finer needles into the central base of the petal, moving upwards slightly and always angling my needles towards the flower centre. This effectively shrinks the base of the petal, causing the outer petal to curl upwards.
The base flower is finished for now and it's time to move on to the upper flower.

The smaller, upper flower is made in exactly the same way as the larger flower, except a little colour is added to the petals before they are shaped. Break off a tiny tuft of a slightly contrasting shade of wool and lay it onto each petal halfway up. To attach it, needle over lightly with the 38 gauge needle and then go over it gently with a couple of 42 gauge needles. Any excess fibre can be lightly felted into the centre, but this will be covered up later anyway.

To attach the two flowers together, place the small flower on top of the larger one and use the heavier gauge needle to attach them together. To do this, firmly poke through the two flowers in a circle to form the flower centre. Repeatedly prodding in a ring will begin to form a mound in the flower centre, and bond the two flowers together at the same time.

To add a little more fullness to the flower centre, add a tiny bit more fibre, and secure it down around the edge, going over the central ring firmly with the heavier gauge needle. Needle over the centre lightly with a finer needle.

... and there you have two completed 3-dimensional needle felted flowers!

I love how much more natural they look than my original cookie-cutter needle felted flowers...

...but still whimsical enough for them to be made in a rainbow of colours to go on my Joyful Wreath.
If you've found this tutorial interesting or useful, please pin it to Pinterest. It makes a big difference to me and helps other crafters find it too.
Other Related blog posts -
 |
| My Joyful Wreath - Completed! |
 |
| Easy Needle Felted Flowers |
 |
| Needle Felted Remembrance Day Poppy |

 |
| Knitted Curlicues - How to Knit a Spiral |
 |
| Rainbow Decoration Knitting Pattern |
 |
| Needle Felted Balls |
 |
| Making Silk Top Pom Poms on the Multipom |

 |
| Crocheted Fairy Lights |
----------
Please be sweet and share the love. Leave a comment, subscribe to my YouTube channel, like my Facebook page for regular updates or follow me on Pinterest, Bloglovin' or Instagram
No comments:
Post a Comment