


Christmas crackers are a big part of our festive traditions - especially in our house. We not only pull them on Christmas Day, but we like to have them on Boxing Day and New Year's Day too. Hand made crackers make it all that little bit more special and personal. I fill my husband's and my daughter's, and my husband fills mine, so we all get a little surprise. Every year we have a budget of just £2 per cracker gift, but I must confess, this is getting a little tricky these days... If you're unfamiliar with the UK tradition of cracker pulling, here's a little Wikipedia link to bring you up to speed...
2 years ago I posted a tutorial on how to make Christmas crackers. At the time I wasn't particularly happy with the results as they were a bit of a last minute effort, and I'd simply used papers that I had left over from scrapbooking. They weren't particularly - shall we say - 'festive'.
We decided to fill our own crackers again this year and so I thought I'd put the proper effort in this time and create a blog post I was happier with.
I wanted our crackers to be a little larger than your average home made toilet roll cracker, so I designed them to be cut from a sheet of A3 card.
Supplies list
- 1 sheet of A3 card per cracker in your choice of colour.
- Scissors.
- 7mm strong double sided sticky tape
.
- Cylinder shape to press down on (a small packet of cracker biscuits would work).
- 30cm+ cracker snaps
.
- Ribbon or string.
- Small gifts.
- Tissue paper or wrapping paper for party hats.
- Jokes (provided below).
You might also like to use -
- Boning tool and scoring board
(optional).
- Tools and supplies for stamping and embossing
(optional).
- Name or initial tags (optional).
The Tutorial

- Lay a sheet of A4 paper along the long edge of some A3 card, moving it from left to right and drawing all the way along the edge of the A4 long edge. This gives you a long piece of card that you can feed through an A4 printer.
- Save the narrow cut section as this will be useful as a template for making paper hats later.

- Print out the cracker template, making sure that you set your printer to accommodate the taller piece of card. On my printer that would be "borderless double A4". Position your template about 2 cm from the top of the page to ensure that you don't lose the bottom. If there's a wrong side to your card, make sure that you print on the reverse.

- Cut all the way around the print out.

- Then start folding. I've marked on mountain folds and valley folds. These are with the printed side of the card facing you. If you are unfamiliar with these terms, basically, a valley fold is folding the card towards yourself, with the crease forming a letter V or valley, and a mountain fold is folding the card away from yourself, with the crease forming a mountain peak like ^ - it's as simple as that!You could use a boning tool or fold it against a metal ruler, but you should end up with something that looks a bit like the photograph above.
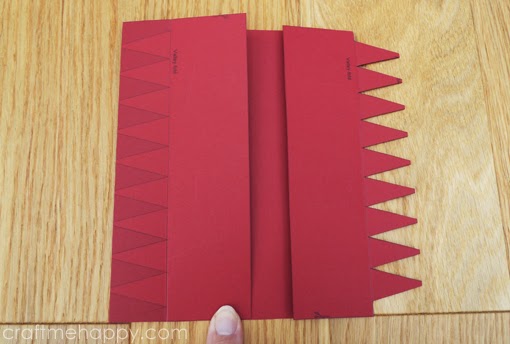
- Then fold your card on the mountain fold with the right sides together and cut out the shaded triangles.

- Once unfolded you should have a cracker base that looks something like this.

- If you want to stamp or emboss on your cracker base, now's a good time.

- I decided to make mine a bit more Christmassy by embossing with my favourite snowflake stamp and white embossing powder.

- Attach a good quality double sided sticky tape to the reverse of all 3 sections of 1 long edge.

- Now it's time to start sticking. Find yourself a nice cylinder shape to insert inside the cracker template. This is just to press down on to stop the cracker from creasing. I found a packet of 'Cheddars' to be the perfect diameter.

- Once all 3 sections have been stuck down you'll have something that's starting to look a lot more like a Christmas cracker.

- Insert your cracker snap inside the cracker and attach it with tape. My cracker snaps are marginally too small for my crackers. The ones I used are 28cm, but 30cm+ ones would have been a little easier to work with.

- Tie a ribbon around 1 handle to bring the cuts together
- Now it's time to start filling your cracker!

- Here are some of the fun things we managed to squeeze into our crackers - don't forget, our budget was less than £2 per cracker and we had to be able to get a gift, a joke and a party hat in there too. (Those dominoes were a bit of a squeeze!)

- Remember that strip of card I told you to save at the beginning? Well it's the perfect size to use as a template for making party hats. Shop bought party hats are made out of tissue paper, but I decided to make mine a bit more durable and cut mine out of good quality wrapping paper instead. Just hold the narrow strip of card against the edge of the wrapping paper and draw along it with a pencil, all the way along the width of the paper. Cut the strip out and then trim it to a little over the circumference of your head. This is when making your own party hats is useful as you could personalise them to fit every member of your family.
- Loop the ends round to form a circle and attach them together using double sided sticky tape.

- Fold your party hat 3 times and then snip a diagonal line downwards from one of the top corners.

One very simple, zig zaggy party hat!
You also need a joke in there too. You could go for quizzes, brain teasers or interesting facts, but I much prefer bad, cheesy Christmas jokes.


Here are a few jokes I've collected over the last few years - Please feel free to leave your own Christmas jokes in the comments.
- Print out your favourite jokes, cut them out and then bundle your gift, hat and joke inside your cracker.

- Tie a ribbon around the second handle.
- Secure the remaining end of the cracker snap with tape.
If you like you could embellish them further with names or initials. I made some little tags using cold porcelain stamped with red ink.
They looked beautiful on our Christmas table and they also made great place settings too.

Please be sweet and share the love. Leave a comment, subscribe to my YouTube channel, like my Facebook page for regular updates or follow me on Pinterest, Bloglovin' or Instagram
4 comments:
fantastic. I am so impressed with the professional looking result!
Great details, I'll be making Christmas Crackers for the first time. Because what else do we have but time on our hands right? Thank you for this great post! 💚 ❤️
Thank you, I'm really looking forward to giving these a try.
Great tutorial thank you xx
Post a Comment