


I've been playing a lot with Hama beads recently. I think it's all the colours and the possibilities of creating amazing pixel art that has me gripped. More of that to come in a few weeks...
A few months ago I pinned an image of a bracelet made out of fuse beads from Craft and Creativity.
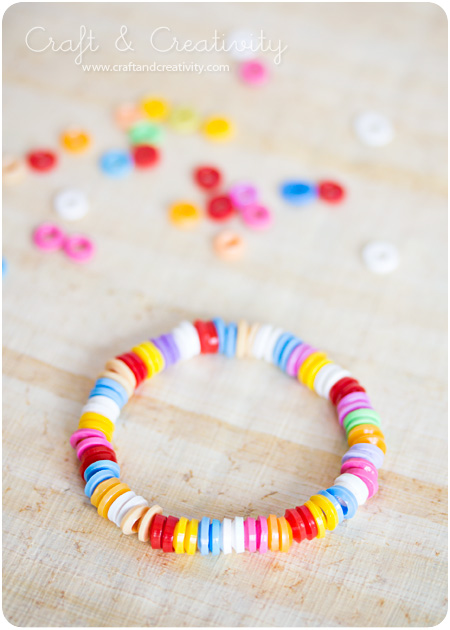
It details how you can melt Hama beads or Perler beads in the oven so that they become flat, with much larger holes. I thought it might be the perfect craft to try with my 4 year old, as the large holes make it so much easier for her to thread through... As it turned out, my daughter lost interest after about 2 minutes. I, on the other hand was enthralled!

The original bracelet above is made using the equivalent of Midi Hama beads. The other project I'm working on uses the very small Mini Hama beads that are designed for children aged 10 and above, so I have an abundance of these tiny fuse beads.
I therefore had no idea how my beads were going to turn out...

I dutifully laid out my mini beads on my non stick baking tray, making sure that they were all standing upright. HOWEVER I've got a fan oven and the mini beads are very small and light, so as soon as I opened the oven door, most of them rolled from their original positions, many of them onto their sides.

The oven was heated to 200 degrees Centigrade and it took less than 2 minutes for them to flatten down to this size and shape. There's really no need to walk away from the oven, you can see them shrink and flatten before your eyes.
The thing I did discover though was that the ones that had rolled onto their side shrank in exactly the same way, so their starting position had no effect on their final shape. My only problem was the ones that had rolled together. They of course had fused to each other and were pretty unusable.

Having had success with the first batch I laid out my next lot. This time I paid little regard to whether they were standing up or on their side. I just made sure that they had a nice distance between each other.

You can see how some shrank standing on their sides - now that's clever!

I took the tray out and left them to cool down for a few minutes.

I then threaded them onto some silk thread - just wide enough to fit over my hand.

I love how the beads have turned out. The mini Hama beads are so delicate. In a certain light they look like hand made glass beads or shells - especially with the mixture of translucent and opaque beads.

----------
Please be sweet and share the love. Leave a comment, subscribe to my YouTube channel, like my Facebook page for regular updates or follow me on Pinterest, Bloglovin' or Instagram
7 comments:
I love your mini hama bead bracelet! I thought about the idea to try melting mini hama beads, but I haven't been able to find any. Yours turned out great!
Thank you for linking to my blog!
Crafty greetings from Sweden
/Helena
Well thank you for the inspiration!
These beads were from a mixed bag that I found on E-bay. I have bought the individual colours on http://www.hamabeads.com though. I believe they deliver internationally too.
So pretty! The colours are gorgeous. I'm not sure I've ever come across Hama beads before. Thanks for sharing at Etcetorize this week!
I think this is such a neat project that I'm featuring it at tonight's Make it Great party! I hope you'll stop by to grab a featured button from the sidebar and link up again~
Great idea. Will add this to my 8yo daughter's upcoming craft party! Thanks.
I dont think the fused beads are useless... They'd be perfect for keepind double or multiple strand bracelets / necklaces together. If they're off- kilter, perhaps, they could stick out, or be used in earings or non-jewelry products
;>
Post a Comment