


Over the last couple of years, I’ve spent a significant amount of time spinning merino and other finer fibres that I’ve prepared myself; whether it’s combed top using my mini wool combs, blended top on my hackle, or rolag-punis on my blending board. Earlier this year, however, I took a trip to Wonderwool Wales where I treated myself to a sweater quantity of fibre -

I bought this hand-painted blue-faced Leicester and camel blend…

… and this blend of Black Welsh wool and merino, along with some recycled sari silk.
 |
| The V Back Tee - image copyright Jamie Hoffman |
I had the idea that I would knit a beautiful, deep red, long-sleeved V-Back Tee sweater to wear on Christmas day. It was going to be luxurious!
Unfortunately, both of the wool tops that I purchased had quite a few coarse fibres, and the recycled sari silk was definitely going to add to the itch factor.
 |
| 3-ply fractal yarn spun from hand-painted top |
 |
| 3-ply yarn spun from Welsh Black wool and Merino, blended with sari silk |
They were still beautiful yarns, and a few years ago I would have been over-the-moon with them, but they just didn’t have the neck soft, quality feel to them that I was hoping for.
Well, I was originally going to knit the V-Back Tee sweater using just two colours, but as I definitely don’t want either of my original yarns to sit around my neck and shoulders, I decided to design my own complementary, 3ply fractal yarn using techniques that I’ve been practicing over the last couple of years.
In a fractal yarn, you divide the hand-painted top down the middle, vertically, into the number of plies you want to spin, and then those sections are divided into an increasing number of sections so that the colour repeats become shorter with each ply. By varying the length of the colour sections within each ply, you take control of the amount of colour pooling when it is plied, and achieve a consistent mix of colours throughout the whole of the yarn.
I’m calling this technique a complex fractal yarn as there will be changes to the colour arrangement within each ply, and it will be much more designed than a fractal yarn, but it will be based on the same basic principle. I’m hoping that the final yarn will have the look of a fractal yarn, but with a much more heathered, complex appearance when you take a closer look.
 |
| Jonquil (yellow), Mediterranean (cyan), raspberry (magenta), scarlet (red) and lightning (white) from World of Wool. Blue and black from John Arbon Textiles |
Instead of using hand-painted top, I’ll be blending merino wool in red, blue, yellow, cyan and magenta, along with black and white. Hopefully, I’ll use my experience with colour blending to design a variegated yarn that is mostly red and burgundy, with the occasional pop of contrasting colour.
I’ll list the recipes for each colour below, but here’s a video showing my combing technique for mixing a beautiful blue/violet colour.
If you'd like to see my process for preparing this yarn in more detail, I've made a 7-minute video here which shows some of the techniques in more detail than I can here.
Ply 1

These are the blended colours I began with for my first ply, and the amount of fibre I can comfortably get onto my hand made hackle. All of these little nests have been hand blended with my 3D printed mini wool combs using the merino wool primaries above.

(Please ignore the spacing of my colours here - it was my first attempt at loading my hackle and my maths went a little awry!)
As the main three colours that are carried throughout all three plies make up three-quarters of the colour content, I divided the number of spikes on my hackle by four and placed the three main colours on this number of spikes. There are 79 spikes on one row of my hackle so I placed the dusky pink on the central 20 spikes and the 2 darker reds on the outer 20 spikes. The olive green and light pink were placed on the remaining, off-centre, 10 and 9 spikes.
(I'll go into my hackle loading technique lower down)

Here’s an animated gif of my technique for pulling off the first ply. I go left and right, using a small hole in my diz to control the amount of fibre drafted off each time. If this was a traditional fractal yarn, this would be the ply that had been divided up the most. I’m pulling off a fibre length of merino, and every time I return my diz to the hackle I move along to the next section of fibre. This ensures that the colour sections are as short as possible.
As I work my way towards the hackle, the colour sections will inevitably become shorter as the fibres become shorter - but this will be the case for all of my plies, so hopefully, it should only add to the complexity of the yarn.


You can see all of the colours in this first ply around the outside of my nest of pulled top.
Ply 2

These are the colours I blended for my 2nd ply. The colour recipes can be found below.

After pulling off the top for the first ply, I decided that I didn't want any green in the other two plies. The green, combined with the reds would result in what would appear to be a lot of brown running through the yarn. I quite like the idea of a little muddiness to tone the yarn down, but I wanted the reds and burgundies to be the dominant colours.

I find inserting a strip of craft plastic to the left of where I want my fibre to end helps me to take better control of where I place the fibre on the hackle. Sliding my fibre down the side of the plastic strip ensures that all of the spikes are filled, without the fibre traveling further along than I want it to.

In a traditional fractal yarn, you might double the number of times the strips of hand-painted top are divided up with each ply. As I'm drafting the fibre off my hackle, I alter the lengths of the colour sections by doubling the amount of fibre I pull off with each pass. If you look carefully, I draft fibre twice from the same spot before moving along to the next section of fibre. This should hopefully give me colour sections that are approximately twice as long as in the first ply.
 |
| Ply 2 Pulled off the hackle |

Here's my pulled top for ply 2, wound into a ball. You have to really look into the ball to see the blue fibre that was pulled off much later on in the first pass along the hackle.
Ply 3

These are the colours I blended for my 3rd ply, the colour recipes can be found below. After blending for my first two plies, I decided that I really wanted all of the colours in this ply to be from the red family, so that there would be a red/pink ply running throughout the entire yarn.

You may have noticed that I changed the arrangement of my main 3 reds with every ply. As I drafted from right to left, and then back again, it meant that the outer two colour sections drafted out twice as long as the centre colour (and appeared half as frequently). For this reason, each of the main reds took turns to be placed in the centre section - another factor that added to the complexity of my final yarn.

In this animated gif you can see that I draft the fibres from the same spot four times before moving onto the next section. If this was a traditional fractal yarn, this would be the ply spun from the least divided hand-painted top section, and the ply with the longest colour areas.

Here's the fibre for the third ply after it's been drafted off my hackle. Hopefully, you can see that the colour sections are much longer than in the previous two plies.
Three full Nano bobbins, ready to ply!

It's really quite exciting, not knowing how my yarn is going to turn out!

Even after I'd plied it on my Hansencrafts Minispinner, I didn't truly get a feel for how well the colours were going to work together until I'd wound it into a skein...

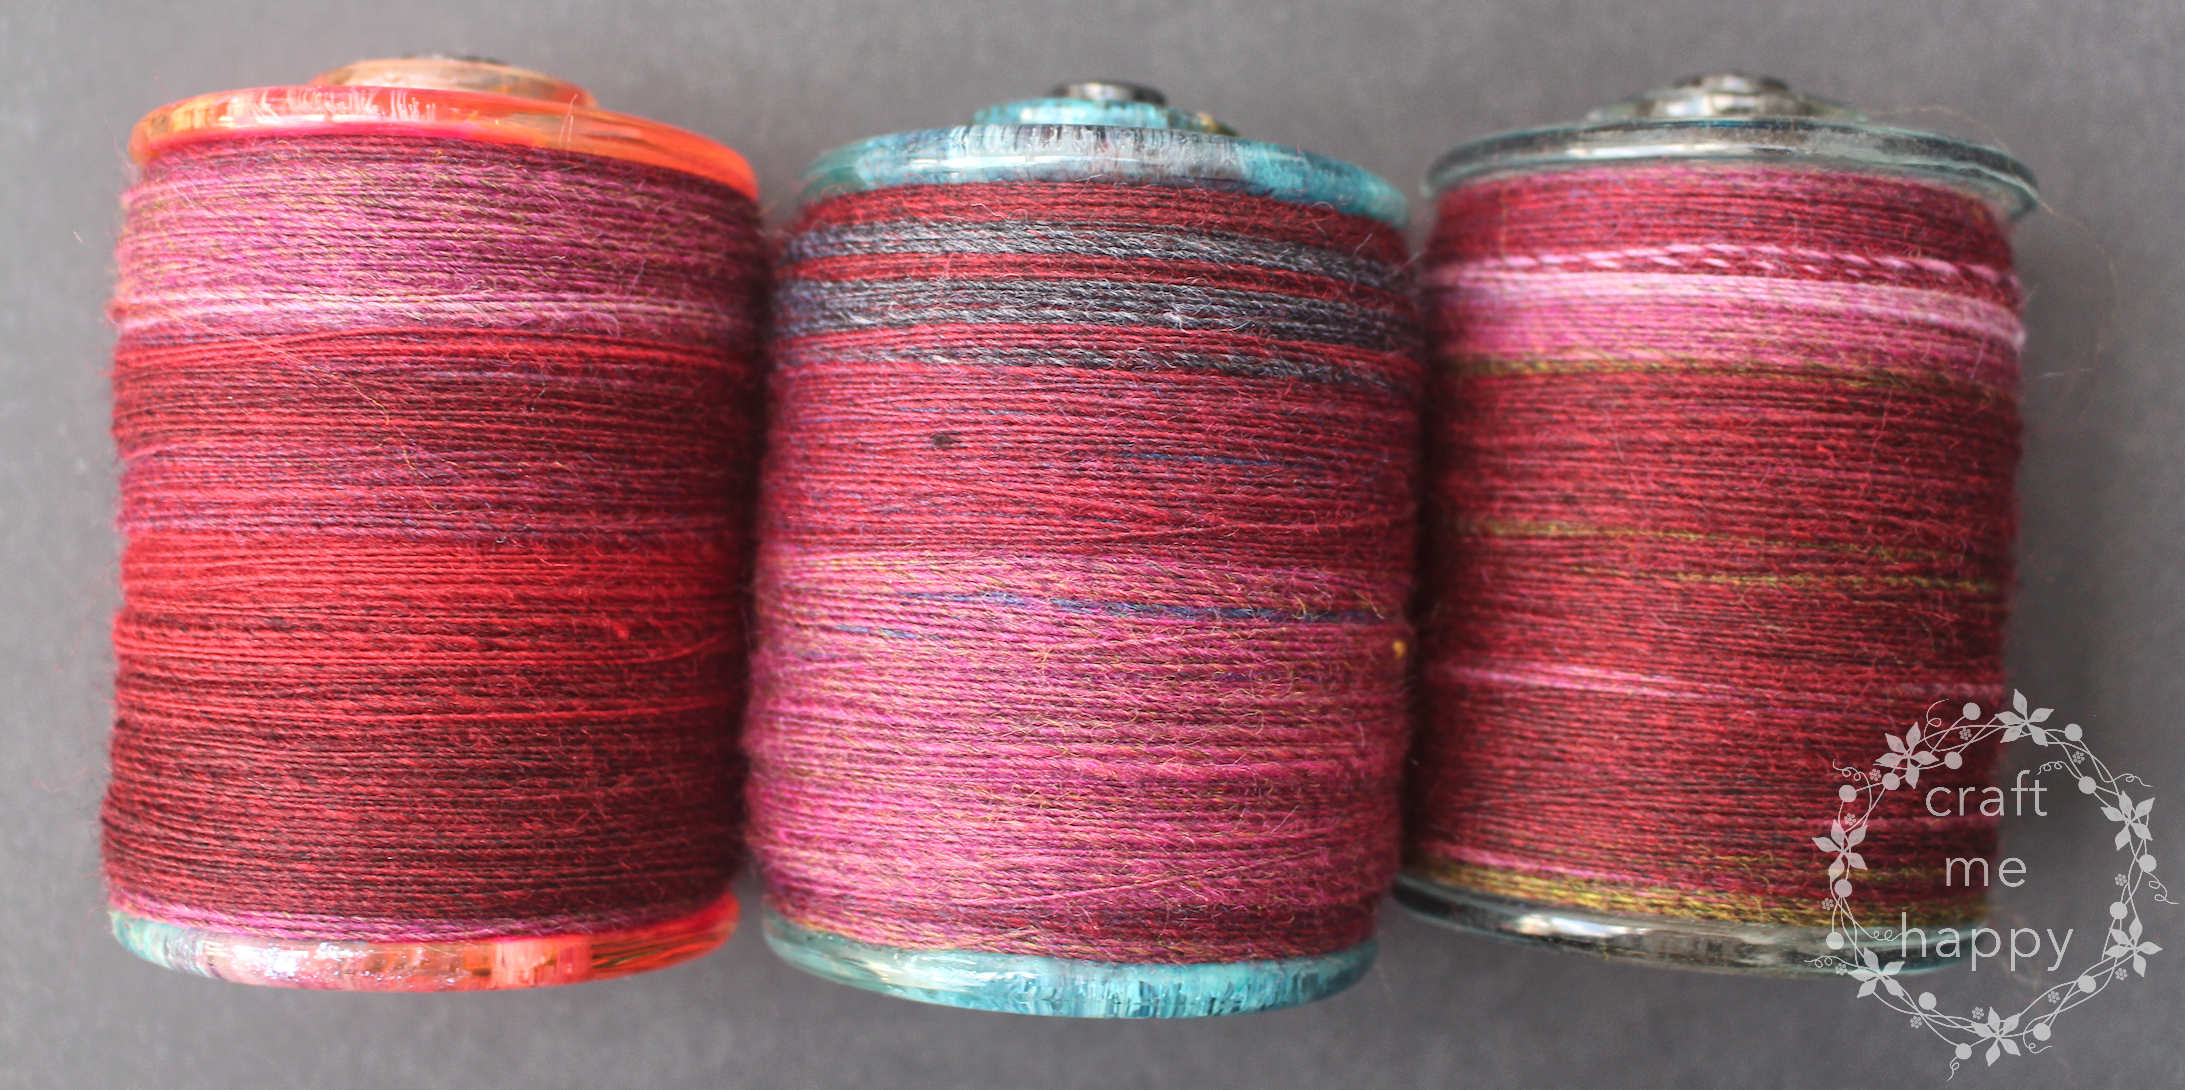
Ta-da! What do you think?! I absolutely love it!

I love how, from across the room, it looks like a heathered, deep red colour with pink stripes running through it, but when you get a little closer, there are so many more colour combinations in there.

I’m actually quite pleased that my original two yarns were slightly disappointing. I’m not sure I would have had the patience to do all of that blending to design my ideal complementary yarn otherwise.

So often I write tutorials, partly to share my techniques, but mostly so that I can look back at my notes in the future and remind myself how I did something at a later date. I do wonder if this is yet another of my tutorials where I’m the only person that is actually bonkers enough to give it a go?
This is quite an extreme example of my complex fractal concept. Of course, not all of the colours need to be blended by hand and you don’t necessarily have to change the colour arrangement with every ply. It could just be a way of using up your stash of dyed wool to create a unique fractal yarn for a fraction of the price of buying hand painted top. Please do let me know if you try out my complex fractal technique. It would really make my day!
If you've found this post interesting or useful, please pin it to Pinterest. It makes a big difference to me and helps other spinners find it too. If you'd like to be updated when I post a video version of this blog post please follow my YouTube channel.
At this point, I normally suggest similar related blog posts, however, my list of spinning-related content is becoming a little unmanageable... If you'd like to read more blog posts about spinning and fibre preparation, please take a look at this page here where you will find links to all of my spinning and fibre articles.
Thank you for reading, and happy spinning!
---
You may be interested in some of my other spinning-related blog posts -


----------
Please be sweet and share the love. Leave a comment, subscribe to my YouTube channel, like my Facebook page for regular updates or follow me on Pinterest, Bloglovin' or Instagram
3 comments:
You really approach it as a scientist. It turned out beautifully. I learn lots when I watch your YouTube or see your blog. Well done.
Wow! So informative and well done. Thank you so much for sharing your knowledge and skill. I just bought a hackle and am looking forward to trying this process.
you are always so inspiring Kathryn - I think I am bonkers enough to give it a go, indeed one needs much less "bonkerness" now that you've opened the way, so thank you!
Post a Comment